
| 일 | 월 | 화 | 수 | 목 | 금 | 토 |
|---|---|---|---|---|---|---|
| 1 | ||||||
| 2 | 3 | 4 | 5 | 6 | 7 | 8 |
| 9 | 10 | 11 | 12 | 13 | 14 | 15 |
| 16 | 17 | 18 | 19 | 20 | 21 | 22 |
| 23 | 24 | 25 | 26 | 27 | 28 | 29 |
| 30 | 31 |
- 선박용어사전
- boatbuilding
- frp보트
- boatbuilding terms
- NCRProcess
- Study Q&A
- Lofting
- marineindustry
- Gel Coat
- TAFE보트빌딩
- Woodworking Machines
- marine engineering
- TAFE Boatbuilding
- 목공 기계
- 보트빌딩
- TAFE
- boatyard
- 조선용어
- 보트빌딩용어
- yacht design basics
- boat terminology
- boatbuilder education
- compositeboat
- shipwright
- 로프팅
- TAFEBoatbuilding
- sailing vocabulary
- 요트제작
- yachtbuilding
- boat parts explained
- Today
- Total
The Yachtwright’s Legacy
Review: MEM25008B 선박 표면·구조물 보수 본문
MEM25008B Repair marine vessel surfaces and structures
A note on sources
The unit codes and unit titles referenced in this post (e.g., the MEM/MSA codes) come from the Australian TAFE boatbuilding curriculum I studied over two years. Beyond borrowing that name and code, however, the actual written content was substantially researched, reorganised, and rewritten with the help of AI to reflect current boatbuilding practice — it is not a reproduction of any textbook, and in many places it differs significantly from the original course material.
If you are currently studying this unit, please treat this post as a personal study aid and general reference only — not as an accurate substitute for your actual coursework, assessment material, or your instructor's guidance. Always check your own institution's materials for anything that matters for assessment.
출처에 대한 안내
이 글에 언급된 과목 코드와 과목명(예: MEM/MSA 코드)은 제가 2년간 이수한 호주 TAFE 보트빌딩 과정에서 가져온 것입니다. 다만 그 이름과 코드를 가져온 것일 뿐, 실제 본문 내용은 AI의 도움을 받아 현재의 보트빌딩 관행에 맞게 상당 부분 조사하고 재구성하고 다시 쓴 것입니다. 특정 교재를 그대로 옮긴 것이 아니며, 여러 부분에서 원래 교재 내용과 상당히 다릅니다.
이 과목을 현재 수강 중이시라면, 이 글은 개인적인 학습 보조 자료이자 일반적인 참고용으로만 봐 주시고, 실제 수업 자료나 평가 자료, 강사님의 안내를 대신할 정확한 자료로는 여기지 말아 주세요. 평가에 반영되는 내용은 항상 소속 기관의 자료를 통해 확인하시기 바랍니다.
What this unit covers / 이 과목의 범위
MEM25008B deals with structural repair of marine vessel surfaces and components — repairing actual damage to the load-bearing laminate, core, or timber structure, as distinct from the routine cosmetic and preventive maintenance covered in the previous unit. This includes impact damage, punctures, delamination, cracked or broken structural members, and water-damaged core in sandwich (cored) panels. The core principle running through the whole unit is that a structural repair must restore the component's original strength and stiffness, not just its appearance — a repair that looks fair and smooth but does not reconnect the fibre load path or match the original laminate schedule is a cosmetic patch, not a structural repair, and can fail under load without warning.
MEM25008B는 선박 표면과 부품의 구조적 보수를 다룹니다. 앞 과목에서 다룬 일상적인 미관 관리와 예방적 유지보수와는 달리, 하중을 지지하는 적층재, 코어, 또는 목재 구조에 실제로 발생한 손상을 보수하는 것입니다. 여기에는 충격 손상, 관통, 박리(delamination), 균열되거나 파손된 구조 부재, 그리고 샌드위치(코어) 패널의 수분 손상 코어가 포함됩니다. 이 과목 전체를 관통하는 핵심 원칙은, 구조적 보수는 외관만이 아니라 부품의 원래 강도와 강성을 복원해야 한다는 것입니다. 페어하고 매끄러워 보이지만 섬유 하중 경로를 다시 연결하지 않거나 원래의 적층 스펙과 일치하지 않는 보수는 구조적 보수가 아니라 미관상의 패치이며, 예고 없이 하중을 받아 파손될 수 있습니다.
Damage Assessment / 손상 평가
1. Assessing the extent of damage / 손상 범위 평가
Visible damage is almost always smaller than actual damage — an impact that cracks the gelcoat on the surface can delaminate the laminate several layers deep and well beyond the visible crack, since the shock wave from an impact spreads sideways through the laminate as it travels inward. Assessment therefore combines several methods rather than relying on a visual check alone: tap testing (a light tap with a coin or small hammer, listening for the dull, hollow sound that indicates delamination or a void beneath a surface that still looks sound), a moisture meter check on cored panels or timber to detect trapped water beyond the obviously damaged area, and, for more significant or safety-critical repairs, professional ultrasonic thickness testing to map the true extent of the damage before cutting begins.
눈에 보이는 손상은 거의 항상 실제 손상보다 작습니다. 표면 젤코트에 균열을 일으키는 충격은, 충격으로 인한 충격파가 안쪽으로 전달되면서 옆으로도 퍼지기 때문에, 눈에 보이는 균열보다 훨씬 넓은 범위에서 적층재를 여러 층 깊이까지 박리시킬 수 있습니다. 따라서 평가는 육안 확인만에 의존하지 않고 여러 방법을 결합합니다: 두드림 검사(동전이나 작은 망치로 가볍게 두드려, 겉보기에는 멀쩡해 보이는 표면 아래의 박리나 공극을 나타내는 둔탁하고 속이 빈 소리를 확인), 코어 패널이나 목재에 대한 함수율계 확인으로 눈에 띄게 손상된 부위를 넘어 갇혀 있는 물을 감지, 그리고 더 크거나 안전에 중요한 보수의 경우 절단을 시작하기 전에 실제 손상 범위를 파악하기 위한 전문적인 초음파 두께 측정을 사용합니다.
2. Cutting back to sound material / 건전한 재료까지 절단
Damaged material is removed back beyond the point where it tests sound, following the general principle that it is far better to remove slightly more material than strictly necessary than to leave hidden delamination at the edge of a repair, where it will continue to spread under future loading. Each layer of a laminate repair is typically opened up progressively wider than the one below it (creating the stepped or bevelled profile discussed in the next section), both to reach sound material at every depth and to prepare the surface geometry the repair itself needs.
손상된 재료는 건전하다고 판정되는 지점을 넘어서까지 제거하며, 엄격히 필요한 것보다 재료를 약간 더 많이 제거하는 것이, 보수 부위 가장자리에 숨겨진 박리를 남겨 이후 하중을 받으며 계속 퍼지도록 두는 것보다 훨씬 낫다는 일반 원칙을 따릅니다. 적층 보수의 각 층은 보통 아래층보다 점진적으로 더 넓게 열어(다음 섹션에서 다룰 계단형 또는 경사형 단면을 만듦), 모든 깊이에서 건전한 재료에 도달함과 동시에 보수 자체에 필요한 표면 형상을 준비합니다.
3. Documenting the original laminate schedule / 원래 적층 스펙 기록
Before repair work begins, it is worth recording what the removed material actually was — fibre type, cloth weight, weave, number of layers, and orientation of each layer — either from existing build records or by carefully examining the exposed edge of the surrounding sound laminate. A structural repair should reproduce this same schedule layer by layer rather than substituting a different fibre type or a single thick layer in place of several thinner ones, since matching the original schedule is what actually restores the component's designed strength and stiffness, rather than just its thickness.
보수 작업을 시작하기 전에, 제거된 재료가 실제로 무엇이었는지 — 섬유 종류, 원단 중량, 직조 방식, 층수, 각 층의 방향 — 를 기존 건조 기록에서 확인하거나, 주변의 건전한 적층재 노출 단면을 주의 깊게 관찰하여 기록해 두는 것이 좋습니다. 구조적 보수는 다른 섬유 종류로 대체하거나 여러 개의 얇은 층 대신 두꺼운 층 하나로 대체하지 않고, 이 스펙을 층마다 그대로 재현해야 합니다. 원래 스펙을 맞추는 것이야말로 단순히 두께가 아니라 부품이 설계된 강도와 강성을 실제로 복원하는 방법이기 때문입니다.
FRP Structural Repair / FRP 구조 보수
4. Stepped and scarfed repair profiles / 계단형·스카프형 보수 단면
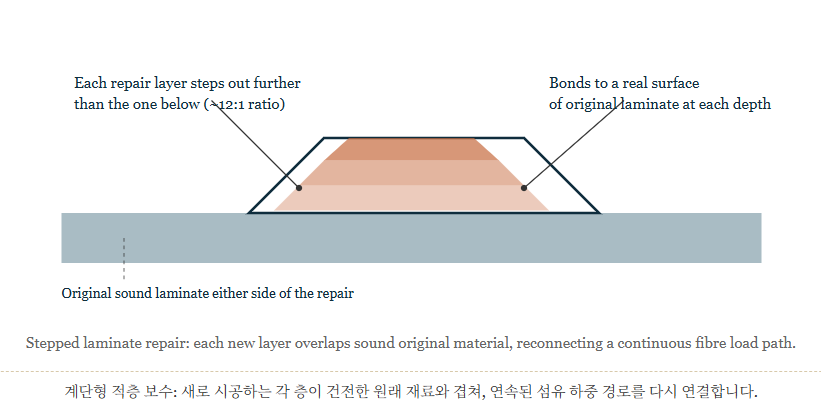
Rather than cutting a simple straight-sided hole and butt-filling it, a structural laminate repair is cut with either a stepped profile (each layer's edge offset progressively from the one below, like an upside-down staircase) or a scarfed/bevelled profile (a single continuous taper through the full thickness, similar in principle to a timber scarf joint), both at a similarly shallow ratio to a structural timber scarf — commonly around 12:1. This geometry lets each new repair layer overlap and bond to a real surface of the surrounding original laminate at every depth, restoring a genuine, continuous fibre load path across the repair rather than relying on the filler alone to carry load at a butt edge.
단순히 직선 가장자리로 구멍을 뚫고 맞대기로 채우는 대신, 구조용 적층 보수는 계단형 단면(각 층의 가장자리가 아래층보다 점진적으로 어긋나, 뒤집힌 계단처럼 보임) 또는 스카프형/경사형 단면(전체 두께를 관통하는 하나의 연속된 경사면으로, 목재 스카프 접합과 원리가 비슷함) 중 하나로 절단하며, 둘 다 목재 구조용 스카프와 비슷하게 완만한 비율(보통 약 12:1)을 사용합니다. 이 형상은 새로 시공하는 각 보수 층이 모든 깊이에서 주변 원래 적층재의 실제 표면과 겹쳐 접착될 수 있게 해 주어, 맞대기 가장자리에서 필러에만 하중을 맡기는 대신 보수 부위 전체에 걸쳐 진정으로 연속된 섬유 하중 경로를 복원합니다.
5. Rebuilding the laminate / 적층 재시공
Repair layers are built up from the deepest, narrowest step outward, matching the fibre type, weight, and orientation of the corresponding original layer at that depth, and using the same resin system (typically epoxy, for the same bonding and moisture-tolerance reasons covered in the sheathing unit) unless a specific compatibility reason dictates otherwise. Where practical, vacuum bagging the repair while it cures helps achieve a fibre/resin ratio and compaction closer to the original factory-laminated material than an open hand lay-up repair typically achieves.
보수 층은 가장 깊고 좁은 단계부터 바깥쪽으로 쌓아 올리며, 그 깊이에 해당하는 원래 층의 섬유 종류, 중량, 방향을 맞추고, 특별한 호환성 문제가 없는 한 동일한 수지 시스템(시딩 과목에서 다룬 것과 같은 접착·수분 내성 이유로 보통 에폭시)을 사용합니다. 가능하다면, 경화되는 동안 보수 부위를 진공백으로 처리하면, 개방식 핸드 레이업 보수로는 일반적으로 얻기 어려운, 원래 공장에서 적층된 재료에 더 가까운 섬유/수지 비율과 압착 상태를 얻는 데 도움이 됩니다.
6. Fairing and finish matching / 페어링과 마감 맞추기
Once the structural laminate is complete and cured, the repair area is faired flush with the surrounding surface using the same fairing principles and guide-coat checking covered in the fairing and shaping unit, then finished to match — colour-matched gelcoat, or a full paint system, depending on how the vessel's surrounding surface was originally finished. Structural repair is completed only when both the strength and the finish restore the component to its original condition; a structurally sound repair that is visibly unfair or mismatched in colour is an incomplete job, not a finished one.
구조용 적층이 완성되고 경화되면, 페어링과 성형 과목에서 다룬 것과 동일한 페어링 원리와 가이드코트 확인 방법을 사용하여 보수 부위를 주변 표면과 매끄럽게 맞춘 뒤, 선박의 주변 표면이 원래 어떻게 마감되었는지에 따라 색을 맞춘 젤코트나 전체 도장 시스템으로 마감합니다. 구조적 보수는 강도와 마감이 모두 부품을 원래 상태로 복원했을 때에만 완료된 것입니다. 구조적으로는 건전하지만 눈에 띄게 페어하지 않거나 색이 맞지 않는 보수는 완료된 작업이 아니라 미완성 작업입니다.
Timber & Core Repair / 목재·코어 보수
7. Removing timber rot / 목재 부식 제거
Rot in a timber structural member is cut back well beyond the visibly discoloured or soft area, since fungal decay typically extends further into sound-looking timber than it visually appears, particularly along the grain. A screwdriver or awl probe test — pressing into the timber and feeling for abnormal softness compared with known-sound timber nearby — helps confirm the true extent before cutting, and any doubt is resolved by removing more material rather than less. The replacement piece is joined in using the same scarf-joint principles covered in the timber components unit, at a similarly shallow slope ratio, so the repair carries load continuously rather than at a weak butt joint.
목재 구조부재의 부식은 눈에 보이는 변색되거나 물러진 부위를 훨씬 넘어서까지 제거합니다. 곰팡이에 의한 부식은 특히 결을 따라, 겉보기에는 멀쩡해 보이는 목재까지 실제로는 더 깊이 침투해 있는 경우가 많기 때문입니다. 드라이버나 송곳으로 눌러보는 검사(주변의 건전한 것으로 알려진 목재와 비교하여 비정상적인 무름을 느끼는 방법)는 절단 전에 실제 손상 범위를 확인하는 데 도움이 되며, 의심스러운 부분이 있으면 재료를 적게가 아니라 더 많이 제거하여 해결합니다. 교체 조각은 목재 부재 과목에서 다룬 것과 동일한 스카프 접합 원리를 사용해 비슷하게 완만한 경사 비율로 이어 붙여, 보수 부위가 약한 맞대기 접합이 아니라 연속적으로 하중을 전달하도록 합니다.
8. Cored / sandwich panel damage / 코어·샌드위치 패널 손상
In a cored (sandwich) panel — typically two thin FRP or wood-epoxy skins bonded either side of a lightweight core such as foam, balsa, or honeycomb — the core itself can be crushed by impact or, more commonly, saturated with water that has entered through an unsealed fastener hole, a cracked skin, or a poorly sealed edge. A crushed core loses its ability to keep the two skins working together as a stiff unit, and a wet core both adds significant weight and, in the case of end-grain balsa or similarly organic cores, can begin to rot from the inside where it cannot be seen.
코어(샌드위치) 패널 — 보통 발포재, 발사(balsa), 허니콤과 같은 경량 코어 양쪽에 얇은 FRP나 우드에폭시 스킨을 접합한 구조 — 에서는, 코어 자체가 충격으로 부서지거나, 더 흔하게는 밀봉되지 않은 체결재 구멍, 균열된 스킨, 또는 제대로 밀봉되지 않은 가장자리를 통해 침투한 물로 인해 흠뻑 젖을 수 있습니다. 부서진 코어는 두 스킨이 강성이 있는 하나의 구조체로 함께 작동하도록 유지하는 능력을 잃으며, 젖은 코어는 상당한 무게를 더할 뿐 아니라, 엔드그레인 발사나 유사한 유기질 코어의 경우 눈에 보이지 않는 내부에서부터 부식이 시작될 수 있습니다.
9. Repairing cored panel damage / 코어 패널 손상 보수
Repair generally follows this sequence: the outer skin over the damaged area is removed, the affected core is cut out and discarded — extending the cutout into surrounding core that tests damp or discoloured, not just the obviously crushed area — and the surrounding area is allowed to dry thoroughly (monitored with a moisture meter) before proceeding. New core material matching the original type and density is bonded in, shaped flush with the surrounding core, and the outer skin is rebuilt over it using the same stepped laminate approach covered above, so the repaired skin reconnects structurally rather than simply sitting over the patched core.
보수는 일반적으로 다음 순서를 따릅니다. 손상된 부위 위의 외부 스킨을 제거하고, 영향을 받은 코어를 잘라내어 버립니다. 이때 눈에 띄게 부서진 부위만이 아니라 습하거나 변색된 것으로 확인되는 주변 코어까지 절단 범위를 넓힙니다. 이후 다음 단계로 진행하기 전에 주변 부위가 (함수율계로 모니터링하며) 완전히 건조되도록 둡니다. 원래 종류와 밀도에 맞는 새 코어 재료를 접합하고 주변 코어와 매끄럽게 다듬은 뒤, 위에서 다룬 것과 동일한 계단형 적층 방식을 사용해 외부 스킨을 재시공하여, 보수된 스킨이 단순히 패치된 코어 위에 얹히는 것이 아니라 구조적으로 다시 연결되도록 합니다.

10. Preventing recurrence / 재발 방지
Because water ingress into a core is so often the actual root cause of core damage, a repair is not complete until the entry path is addressed — sealing every fastener that penetrates a cored panel with a properly bedded, sealed fitting (rather than a bare screw straight into open core), and ensuring cut or drilled edges of cored panels are sealed with resin before the panel is closed up or fitted out. A cosmetically perfect core repair that ignores the original entry point simply relocates the same failure to happen again nearby.
코어로의 수분 침투는 코어 손상의 실제 근본 원인인 경우가 매우 많으므로, 침투 경로를 해결하지 않으면 보수가 완료된 것이 아닙니다. 코어 패널을 관통하는 모든 체결재는 (열린 코어에 나사를 그대로 박는 대신) 제대로 베딩되고 밀봉된 피팅으로 처리하고, 코어 패널의 절단되거나 드릴된 가장자리는 패널을 마감하거나 조립하기 전에 수지로 밀봉해야 합니다. 원래의 침투 지점을 무시한, 겉보기에는 완벽한 코어 보수는 같은 파손이 근처에서 다시 발생할 위치를 옮겨 놓는 것에 불과합니다.
Tools & Safety / 도구·안전
11. Tools and equipment / 도구 및 장비
| Tool / 도구 | Use / 용도 |
| Moisture meter | Detects trapped water beyond the visibly damaged area in cored panels and timber, guiding how far to extend a cutout. 코어 패널과 목재에서 눈에 띄게 손상된 부위를 넘어 갇혀 있는 물을 감지하여, 절단 범위를 어디까지 넓혀야 하는지 판단하는 데 도움을 줍니다. |
| Oscillating multi-tool | Cuts clean, controlled edges and steps when opening up a repair area, particularly useful for precise stepped or bevelled profiles. 보수 부위를 열 때 깔끔하고 제어된 가장자리와 단차를 절단하며, 정밀한 계단형·경사형 단면을 만드는 데 특히 유용합니다. |
| Ultrasonic thickness gauge | Used on larger or safety-critical repairs to map the true extent of delamination or laminate thinning before cutting begins. 더 크거나 안전에 중요한 보수에서, 절단을 시작하기 전에 박리나 적층재 감육의 실제 범위를 파악하는 데 사용됩니다. |
| Vacuum bagging equipment | Compacts repair laminate under even pressure during cure, improving fibre/resin ratio consistency closer to the original factory laminate. 경화 중 보수 적층재를 균일한 압력으로 압착하여, 원래 공장 적층재에 더 가까운 섬유/수지 비율의 일관성을 개선합니다. |
| Screwdriver/awl (probe test) | Probes timber for abnormal softness to confirm the true extent of rot before cutting, as described above. 위에서 설명한 대로, 절단 전에 부식의 실제 범위를 확인하기 위해 목재의 비정상적인 무름을 확인하는 데 사용됩니다. |
12. Safe working practices / 안전 작업 수칙
- Wear dust extraction and respiratory protection when cutting or sanding old laminate, since cutting into aged gelcoat and resin can release dust from materials whose exact composition and age are not always known.
- Wear gloves and skin protection when mixing and applying epoxy for structural repairs, since these repairs often involve extended working time in close contact with wet resin.
- Ensure adequate ventilation and ideally work outdoors or with forced ventilation when cutting into a wet, rotten, or long-damp core or timber section, since trapped organic decay can carry mould spores in addition to the usual dust and resin hazards.
- Confirm safe access and adequate support before working inside a hull, bilge, or confined structural space, which can present restricted movement, poor ventilation, and manual handling risks.
- For any repair to a structural or safety-critical component (keel attachment, chainplates, structural bulkheads, and similar), have the completed repair reviewed against the vessel's original design or by a suitably qualified surveyor before the vessel returns to service, rather than relying solely on visual inspection of the finished work.
- Dispose of removed laminate, rotten timber, and resin waste according to workshop and local environmental requirements.
- 오래된 적층재를 절단하거나 샌딩할 때는 집진장치와 보호구를 착용합니다. 오래된 젤코트와 수지를 절단하면 정확한 조성과 연식을 항상 알 수 없는 재료에서 나온 분진이 발생할 수 있습니다.
- 구조적 보수를 위해 에폭시를 배합하고 도포할 때는 장갑과 피부 보호구를 착용합니다. 이러한 보수는 종종 젖은 수지와 밀접하게 접촉하는 작업 시간이 길어집니다.
- 젖었거나 부식되었거나 오랫동안 습했던 코어나 목재 부위를 절단할 때는 충분한 환기를 확보하고, 가능하면 실외나 강제 환기 조건에서 작업합니다. 갇혀 있던 유기물 부식은 일반적인 분진·수지 위험 외에도 곰팡이 포자를 포함할 수 있습니다.
- 선체, 빌지, 또는 밀폐된 구조 공간 내부에서 작업하기 전에는 안전한 접근과 충분한 지지를 확인합니다. 이러한 공간은 제한된 움직임, 열악한 환기, 인력 취급 위험을 초래할 수 있습니다.
- 구조적이거나 안전에 중요한 부품(킬 부착부, 체인플레이트, 구조 격벽 등)에 대한 보수는, 완성된 외관 검사에만 의존하지 말고 선박이 다시 운항되기 전에 원래 설계와 대조하여 검토하거나 적절히 자격을 갖춘 조사관(서베이어)의 확인을 받습니다.
- 제거된 적층재, 부식된 목재, 수지 폐기물은 작업장 및 현지 환경 규정에 따라 폐기합니다.
'Marine Composites' 카테고리의 다른 글
| Review: MEM25013B 3차원 플러그·몰드 제작 (0) | 2026.08.01 |
|---|---|
| Review: MEM25010B 선박 피트아웃(의장) 작업 (0) | 2026.07.31 |
| Review: MEM25007B 선박 표면 유지관리 (0) | 2026.07.29 |
| Review: MEM25006B 선박 시딩(외피 보강) 작업 (0) | 2026.07.28 |
| Review: MEM25005B 선박 목재 부재 제작과 조립 (0) | 2026.07.27 |


