
| 일 | 월 | 화 | 수 | 목 | 금 | 토 |
|---|---|---|---|---|---|---|
| 1 | ||||||
| 2 | 3 | 4 | 5 | 6 | 7 | 8 |
| 9 | 10 | 11 | 12 | 13 | 14 | 15 |
| 16 | 17 | 18 | 19 | 20 | 21 | 22 |
| 23 | 24 | 25 | 26 | 27 | 28 | 29 |
| 30 | 31 |
- marineindustry
- TAFE보트빌딩
- yacht design basics
- TAFE
- 요트제작
- boatbuilding
- boatbuilder education
- 조선용어
- sailing vocabulary
- NCRProcess
- 보트빌딩
- boatbuilding terms
- Study Q&A
- Lofting
- 선박용어사전
- 보트빌딩용어
- marine engineering
- Woodworking Machines
- boat parts explained
- boat terminology
- shipwright
- Gel Coat
- TAFE Boatbuilding
- frp보트
- boatyard
- yachtbuilding
- TAFEBoatbuilding
- compositeboat
- 목공 기계
- 로프팅
- Today
- Total
The Yachtwright’s Legacy
Review: MEM25006B 선박 시딩(외피 보강) 작업 본문
MEM25006B Undertake marine sheathing operations
A note on sources
The unit codes and unit titles referenced in this post (e.g., the MEM/MSA codes) come from the Australian TAFE boatbuilding curriculum I studied over two years. Beyond borrowing that name and code, however, the actual written content was substantially researched, reorganised, and rewritten with the help of AI to reflect current boatbuilding practice — it is not a reproduction of any textbook, and in many places it differs significantly from the original course material.
If you are currently studying this unit, please treat this post as a personal study aid and general reference only — not as an accurate substitute for your actual coursework, assessment material, or your instructor's guidance. Always check your own institution's materials for anything that matters for assessment.
출처에 대한 안내
이 글에 언급된 과목 코드와 과목명(예: MEM/MSA 코드)은 제가 2년간 이수한 호주 TAFE 보트빌딩 과정에서 가져온 것입니다. 다만 그 이름과 코드를 가져온 것일 뿐, 실제 본문 내용은 AI의 도움을 받아 현재의 보트빌딩 관행에 맞게 상당 부분 조사하고 재구성하고 다시 쓴 것입니다. 특정 교재를 그대로 옮긴 것이 아니며, 여러 부분에서 원래 교재 내용과 상당히 다릅니다.
이 과목을 현재 수강 중이시라면, 이 글은 개인적인 학습 보조 자료이자 일반적인 참고용으로만 봐 주시고, 실제 수업 자료나 평가 자료, 강사님의 안내를 대신할 정확한 자료로는 여기지 말아 주세요. 평가에 반영되는 내용은 항상 소속 기관의 자료를 통해 확인하시기 바랍니다.
What this unit covers / 이 과목의 범위
MEM25006B deals with the practical skills used to sheathe a timber hull or component — applying an epoxy-and-fibreglass (or similar reinforced) skin over the timber surface to protect it from moisture ingress, abrasion, and UV damage, and to add stiffness and impact resistance beyond what the bare timber provides alone. Sheathing is distinct from the FRP moulding covered elsewhere in the course: rather than the fibreglass and resin forming the primary structural shape in a mould, here the timber structure itself is already complete, and the sheathing is a protective and reinforcing skin bonded directly onto it. This is standard practice on modern strip-planked and cold-moulded wood-epoxy builds, and is also widely used to re-skin and extend the working life of older timber hulls during restoration.
MEM25006B는 목재 선체나 부품을 시딩(sheathing)하는 실무 기술을 다룹니다. 즉, 목재 표면 위에 에폭시-유리섬유(또는 유사한 강화재) 외피를 도포하여 수분 침투, 마모, 자외선 손상으로부터 보호하고, 원목만으로는 얻을 수 없는 강성과 내충격성을 더하는 작업입니다. 시딩은 과정의 다른 부분에서 다루는 FRP 몰딩과는 다릅니다. 몰드 안에서 유리섬유와 수지가 주요 구조 형상을 만드는 것이 아니라, 여기서는 목재 구조가 이미 완성된 상태이며 시딩은 그 위에 직접 접합되는 보호·보강용 외피입니다. 이는 현대의 스트립 플랭크·콜드몰디드 우드 에폭시 건조에서 표준적인 관행이며, 복원 작업에서 오래된 목재 선체에 다시 외피를 씌워 사용 수명을 연장하는 데에도 널리 사용됩니다.
Sheathing Materials / 시딩 재료
1. Resin selection / 수지 선택
Epoxy resin is the standard choice for sheathing over timber, for three main reasons: it bonds chemically and mechanically far better to wood than polyester does; it is far more tolerant of the small residual moisture content that even well-dried timber retains, whereas polyester's cure and long-term adhesion suffer more from that same moisture; and it shrinks noticeably less during cure, reducing the risk of print-through or bond-line stress at the timber-to-resin interface. Polyester or vinylester resin remains appropriate for sheathing over an already-cured FRP or gel coat surface, but is generally not recommended as the primary sheathing resin directly over bare timber.
에폭시 수지는 목재 시딩의 표준 선택지이며, 여기에는 세 가지 주요 이유가 있습니다. 첫째, 폴리에스터보다 목재에 화학적·기계적으로 훨씬 더 잘 접착됩니다. 둘째, 잘 건조된 목재라도 남아 있는 소량의 잔류 수분에 훨씬 더 잘 견디는 반면, 폴리에스터는 같은 수분으로 인해 경화와 장기 접착력이 더 크게 저하됩니다. 셋째, 경화 중 수축이 눈에 띄게 적어, 목재-수지 접합면에서 프린트스루나 접착선 응력의 위험을 줄여줍니다. 폴리에스터나 비닐에스터 수지는 이미 경화된 FRP나 젤코트 표면 위를 시딩할 때는 여전히 적합하지만, 원목 위에 직접 시딩하는 주수지로는 일반적으로 권장되지 않습니다.
2. Fibreglass cloth weight and weave / 유리섬유 원단 중량과 직조
A lighter, plain-weave fibreglass cloth — commonly in the range of roughly 160–300 gsm (grams per square metre) — is the usual choice for general hull sheathing, since a lighter cloth wets out cleanly, drapes over curves without excessive print-through, and keeps the added weight and cost reasonable over a large surface area. Heavier woven cloth or biaxial fabric is reserved for areas needing extra strength or abrasion resistance rather than used across the whole hull, since heavier cloth is harder to wet out fully without trapping air and shows more print-through under gloss finishes.
가볍고 평직인 유리섬유 원단(대략 160~300 gsm, 제곱미터당 그램 범위)이 일반적인 선체 시딩에 흔히 선택됩니다. 가벼운 원단은 깨끗하게 함침되고, 과도한 프린트스루 없이 곡면을 잘 따라가며, 넓은 표면적에 걸쳐 추가되는 무게와 비용을 합리적인 수준으로 유지해 주기 때문입니다. 더 무거운 직조 원단이나 이축 원단은 선체 전체가 아니라 추가 강도나 내마모성이 필요한 부위에 국한하여 사용합니다. 무거운 원단은 공기를 가두지 않고 완전히 함침시키기가 더 어렵고, 광택 마감 아래에서 프린트스루가 더 두드러지기 때문입니다.
3. Abrasion-resistant fabrics / 내마모성 원단
On high-wear areas — keels, bilge runners, or anywhere a hull is expected to touch bottom, beach, or rub against a jetty — a tougher, more abrasion- and impact-resistant fabric such as a polyester-based sheathing cloth (e.g. Dynel-type fabric) is sometimes applied over or in place of standard glass cloth in that local area. This fabric resists surface wear and impact better than plain fibreglass but is generally more difficult to achieve a fully clear, high-gloss finish over, so its use is usually limited to areas where durability matters more than cosmetic clarity.
내마모성이 요구되는 부위 — 킬, 빌지 러너, 또는 선체가 바닥이나 해변에 닿거나 부두에 스칠 가능성이 있는 모든 부위 — 에는, 표준 유리섬유 원단 대신 또는 그 위에 더 질기고 내마모성·내충격성이 좋은 폴리에스터 계열 시딩 원단(예: 다이넬(Dynel) 계열 원단)을 국부적으로 적용하는 경우가 있습니다. 이러한 원단은 평직 유리섬유보다 표면 마모와 충격에 더 잘 견디지만, 일반적으로 완전히 투명하고 광택이 높은 마감을 얻기가 더 어렵기 때문에, 미관보다 내구성이 더 중요한 부위에 사용이 제한되는 경우가 많습니다.
4. Number and placement of layers / 층수와 배치
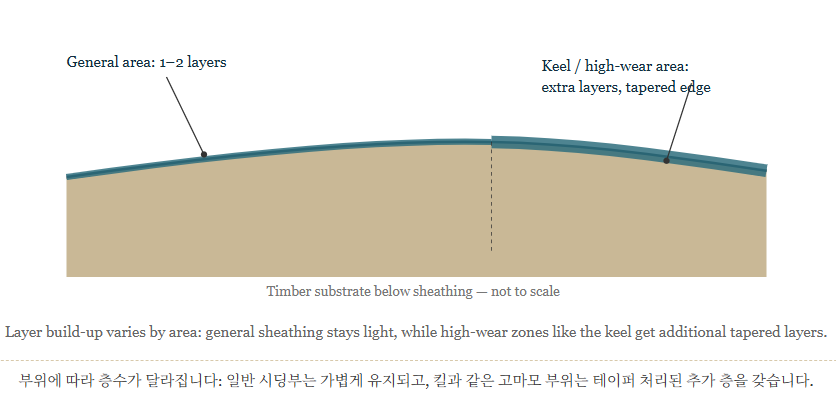
A single layer of sheathing cloth provides moisture and UV protection but only a modest increase in stiffness and impact resistance; multiple layers add proportionally more strength and durability at the cost of added weight and material cost, so layer count is usually chosen per area of the hull rather than uniformly over the whole vessel. General topside and above-waterline areas commonly receive one to two layers, while high-load or high-wear areas such as the keel, stem, and chines are typically built up with additional layers specifically at those local areas, tapering back into the general sheathing to avoid a hard, abrupt edge.
한 겹의 시딩 원단은 수분·자외선 보호를 제공하지만 강성과 내충격성 향상은 제한적입니다. 여러 겹으로 시공하면 무게와 재료비가 늘어나는 대신 강도와 내구성이 비례해서 커지므로, 층수는 보통 선체 전체에 균일하게 적용하기보다 부위별로 결정합니다. 일반적인 상부 구조와 흘수선 위 부위는 보통 한두 겹을 적용하는 반면, 킬·스템·바인 등 고하중·고마모 부위에는 그 국부 부위에만 층을 추가로 쌓아 올리며, 일반 시딩부와의 경계에서 갑작스럽게 두꺼워지지 않도록 점차 얇아지게(테이퍼) 처리합니다.
Surface Preparation / 표면 준비
5. Confirming timber moisture content / 목재 함수율 확인
Before sheathing begins, the timber substrate is checked with a moisture meter to confirm it is genuinely dry, not just dry to the touch. Sheathing effectively seals the timber underneath from the outside air, so any moisture trapped in the wood at the time of sheathing has nowhere to escape afterwards — this is one of the most common causes of hidden rot developing under an otherwise sound-looking sheathed surface. If moisture content is too high, the timber must be given time to dry further (or actively dried) before sheathing proceeds, rather than proceeding on a schedule and hoping the wood dries out later.
시딩을 시작하기 전에, 목재 기재가 만졌을 때 건조해 보이는 정도가 아니라 실제로 건조한지 함수율계로 확인합니다. 시딩은 사실상 아래의 목재를 외부 공기로부터 밀봉하므로, 시딩 시점에 목재 안에 갇힌 수분은 이후 빠져나갈 곳이 없습니다. 이는 겉보기에는 멀쩡해 보이는 시딩된 표면 아래에서 숨겨진 부식이 발생하는 가장 흔한 원인 중 하나입니다. 함수율이 너무 높다면, 일정에 맞춰 진행하며 나중에 목재가 마르기를 바라는 대신, 시딩을 진행하기 전에 목재가 더 건조되도록 시간을 두거나(또는 적극적으로 건조시켜) 조치해야 합니다.
6. Surface fairing before sheathing / 시딩 전 표면 페어링
The timber surface should already be fair (see the fairing and shaping unit) before sheathing, since the cloth and resin will telegraph — not hide — any remaining hollows, humps, or fastener heads standing proud of the surface. Screw or nail holes, plane marks, and small gaps between planks or panels are filled with epoxy filler and sanded fair, and any dust from that sanding is thoroughly removed before sheathing begins, since dust trapped under the cloth weakens the bond at that spot.
목재 표면은 시딩 전에 이미 페어한 상태여야 합니다(페어링과 성형 관련 과목 참고). 원단과 수지는 남아 있는 오목한 부분, 튀어나온 부분, 또는 표면 위로 튀어나온 체결재 머리를 감춰 주지 않고 그대로 드러내기 때문입니다. 나사·못 구멍, 대패 자국, 플랭크나 패널 사이의 작은 틈은 에폭시 필러로 메우고 페이퍼로 샌딩하며, 그 샌딩에서 나온 분진은 시딩을 시작하기 전에 철저히 제거합니다. 원단 아래에 갇힌 분진은 그 지점의 접착력을 약화시키기 때문입니다.
7. Workshop conditions / 작업장 조건
Ambient temperature and humidity affect epoxy working time, cure quality, and the risk of moisture-related surface defects such as amine blush (see below). Sheathing is generally scheduled for conditions within the resin manufacturer's specified temperature range, avoiding both very cold conditions (which slow cure and can leave the resin under-cured) and very hot conditions (which shorten working time and increase exotherm risk over a large wetted-out area). High humidity, particularly combined with a timber surface cooler than the surrounding air, risks condensation forming on the surface right before or during application, which will compromise the bond.
주변 온도와 습도는 에폭시의 작업 가능 시간, 경화 품질, 그리고 아민 블러시(아래 참고)와 같은 수분 관련 표면 결함의 위험에 영향을 줍니다. 시딩은 일반적으로 수지 제조사가 지정한 온도 범위 내의 조건에서 계획하며, 경화를 늦추고 수지를 미경화 상태로 남길 수 있는 매우 추운 조건과, 작업 가능 시간을 단축시키고 넓게 함침된 면적에서 발열 위험을 높이는 매우 더운 조건 모두를 피합니다. 특히 목재 표면 온도가 주변 공기보다 낮은 상태에서 습도가 높으면, 도포 직전이나 도중에 표면에 결로가 생길 위험이 있으며, 이는 접착력을 저하시킵니다.
Application Technique / 도포 기법
8. Seal coat before laying cloth / 원단 적층 전 실링 코트
Many modern sheathing procedures apply a thin seal coat of neat (unfilled) epoxy directly onto the bare, prepared timber first, allowing it to soak in and begin to gel slightly, before laying the dry cloth on top and wetting it out — rather than laying dry cloth straight onto bare, unsealed timber. This pre-wetting step reduces the risk of the timber's own texture and grain pulling resin unevenly away from the cloth during wet-out, which can otherwise leave the cloth locally resin-starved right at the timber interface.
많은 현대 시딩 절차에서는, 건조한 원단을 미밀봉 상태의 원목 위에 바로 얹는 대신, 먼저 준비된 원목 표면에 충전재가 없는 순수 에폭시를 얇게 실링 코트로 도포하여 스며들고 약간 겔화되도록 한 뒤, 그 위에 건조한 원단을 얹고 함침시킵니다. 이 예비 함침 단계는, 함침 과정에서 목재 자체의 질감과 결이 원단에서 수지를 고르지 않게 빨아들이는 것을 줄여주며, 이를 방지하지 않으면 목재 접합면 바로 위에서 원단이 국부적으로 수지 부족 상태가 될 수 있습니다.
9. Laying and wetting out the cloth / 원단 배치와 함침
Dry cloth is laid out over the seal coat and smoothed by hand to remove major wrinkles before any resin is applied on top, since a wrinkle worked in after wet-out is far harder to correct without disturbing the surrounding area. Resin is then poured and spread with a plastic squeegee, working from the centre outward in overlapping strokes, saturating the cloth until it turns fully transparent with no white (dry) patches remaining — a dry white patch indicates insufficient resin at that spot, while a resin-rich puddle indicates too much, both of which should be corrected during the same wet-out pass rather than left for later.
건조한 원단을 실링 코트 위에 펼쳐 놓고, 위에 수지를 도포하기 전에 손으로 눌러 주요 주름을 제거합니다. 함침 후에 생긴 주름은 주변을 건드리지 않고 바로잡기가 훨씬 어렵기 때문입니다. 이후 수지를 부어 플라스틱 스퀴지로 펼치며, 중심에서 바깥쪽으로 겹치는 스트로크로 작업하여, 흰색(건조) 부분이 남지 않고 완전히 투명해질 때까지 원단을 함침시킵니다. 흰색 건조 부분이 남아 있다면 그 지점의 수지가 부족한 것이고, 수지가 고여 있다면 과다한 것이므로, 두 경우 모두 나중으로 미루지 말고 같은 함침 작업 중에 바로잡아야 합니다.
10. Overlaps and seams / 겹침과 이음선
Where one piece of cloth ends and the next begins, an overlap of roughly 50–75 mm is standard, so the joint is backed by double thickness rather than left as an unreinforced butt line — a plain butt join between two pieces of cloth leaves a weak, unreinforced seam exactly where full strength is needed. When multiple layers are applied, seams in each layer are staggered relative to the layer below, so that no single line runs through the full sheathing thickness at one point, spreading any local weakness across the structure rather than concentrating it.
한 원단 조각이 끝나고 다음 조각이 시작되는 지점에서는 보통 약 50~75mm의 겹침을 둡니다. 이렇게 하면 이음부위가 보강되지 않은 맞대기선이 아니라 두 겹 두께로 뒷받침됩니다. 두 원단 조각 사이의 단순한 맞대기 접합은, 정확히 전체 강도가 필요한 지점에 약하고 보강되지 않은 이음선을 남깁니다. 여러 층을 도포할 때는 각 층의 이음선을 아래층과 어긋나게 배치하여, 어느 한 지점에서 전체 시딩 두께를 관통하는 단일 선이 생기지 않도록 하고, 국부적인 약점이 한 곳에 집중되지 않고 구조 전체에 분산되도록 합니다.

11. Removing air and excess resin / 공기와 여분의 수지 제거
After wet-out, the surface is rolled or squeegeed again to press out trapped air bubbles and draw off excess resin, since both trapped air and a resin-rich surface reduce the strength and increase the weight of the finished sheathing without adding any benefit. This pass is particularly important around curves, corners, and where the cloth overlaps, since these are the areas most prone to trapping air during the initial lay-up.
함침 후에는 롤러나 스퀴지로 다시 눌러 갇힌 기포를 빼내고 여분의 수지를 제거합니다. 갇힌 공기와 수지 과다 표면은 모두 완성된 시딩의 강도를 낮추고 무게만 늘릴 뿐 아무런 이점을 더하지 않기 때문입니다. 이 작업은 곡면, 모서리, 원단이 겹치는 부위에서 특히 중요한데, 초기 적층 과정에서 공기가 가장 잘 갇히는 부위이기 때문입니다.
Curing, Finishing & Safety / 경화·마감·안전
12. Curing and post-cure sanding / 경화와 경화 후 샌딩
Sheathing is left to cure fully according to the resin manufacturer's schedule before further work — a surface that feels hard to the touch may still be under-cured underneath, so cure time should be followed rather than judged by touch alone. Once cured, the surface is lightly sanded to remove surface texture, minor drips, or high spots before any coating goes over it, taking care not to sand through the cloth into the resin-starved layer beneath, which would compromise the sheathing's protection at that spot.
시딩은 이후 작업을 하기 전에 수지 제조사의 경화 일정에 따라 완전히 경화되도록 둡니다. 만졌을 때 단단하게 느껴지는 표면도 내부는 아직 미경화 상태일 수 있으므로, 촉감만으로 판단하지 말고 경화 시간을 따라야 합니다. 경화가 완료되면, 코팅을 도포하기 전에 표면 질감, 작은 흘러내림, 튀어나온 부분을 제거하기 위해 가볍게 샌딩하며, 원단을 뚫고 그 아래의 수지가 부족한 층까지 샌딩하지 않도록 주의합니다. 그렇게 되면 그 지점의 시딩 보호 성능이 저하됩니다.
13. Amine blush / 아민 블러시
Many epoxy hardener systems can produce a thin, waxy surface film as they cure, known as amine blush, which is water-soluble but can seriously impair the adhesion of any subsequent coat (further epoxy, primer, or paint) applied directly over it without being removed first. Amine blush is generally removed by washing the cured surface with clean water and an abrasive pad or light sanding, then allowing it to dry fully, before proceeding with the next coat — skipping this step is a common cause of later coating delamination that seems to happen for no obvious reason.
많은 에폭시 경화제 시스템은 경화 과정에서 아민 블러시(amine blush)라고 하는 얇고 왁스 같은 표면막을 형성할 수 있습니다. 이는 수용성이지만, 먼저 제거하지 않고 그 위에 바로 도포되는 이후 코팅(추가 에폭시, 프라이머, 도료)의 접착력을 심각하게 저하시킬 수 있습니다. 아민 블러시는 일반적으로 경화된 표면을 깨끗한 물과 연마 패드나 가벼운 샌딩으로 씻어낸 뒤 완전히 건조시킨 다음, 다음 코팅을 진행하는 방식으로 제거합니다. 이 단계를 건너뛰는 것은 뚜렷한 이유 없이 나중에 코팅 박리가 발생하는 흔한 원인입니다.
14. UV protection / 자외선 보호
Cured epoxy is not UV-stable on its own: prolonged sunlight exposure breaks down unprotected epoxy, causing it to chalk, discolour, and lose surface integrity over time. Sheathed surfaces must always be finished with a UV-resistant topcoat — a marine paint system, a UV-inhibited varnish (where a clear, wood-look finish is wanted), or a gel coat — applied within the coating manufacturer's recoat window after the amine blush has been removed. Leaving sheathed epoxy exposed to sunlight without a UV topcoat, even temporarily "until it gets painted later," measurably shortens the life of the sheathing.
경화된 에폭시는 그 자체로는 자외선에 안정적이지 않습니다. 장기간 햇빛에 노출되면 보호되지 않은 에폭시가 분해되어 백화(chalking) 현상이 생기고, 변색되며, 시간이 지나면서 표면 강도를 잃습니다. 시딩된 표면은 아민 블러시를 제거한 후, 도료 제조사가 지정한 재도장 가능 기간 내에 항상 자외선 저항성 상도(marine paint 시스템, 목재 질감을 살리고 싶을 경우 자외선 억제제가 포함된 바니시, 또는 젤코트)로 마감해야 합니다. "나중에 어차피 도장할 거니까"라는 이유로 자외선 차단 없이 시딩된 에폭시를 잠시라도 햇빛에 노출시켜 두면, 시딩의 수명이 눈에 띄게 단축됩니다.
15. Inspection for defects / 결함 검사
A cured sheathing job is checked for defects before final finishing: tapping lightly across the surface with a coin or the handle of a tool and listening for a change in sound (a duller, hollow-sounding "thud" instead of a crisp tap) can reveal delamination or a void beneath the surface; visually checking for pinholes, resin-starved white patches, or wrinkles under raking light; and confirming there is no remaining amine blush before coating. Any defect found is corrected at this stage — by cutting back, re-wetting, or patching the affected area — rather than coated over and left to fail later.
경화된 시딩 작업은 최종 마감 전에 결함을 점검합니다. 동전이나 공구 손잡이로 표면을 가볍게 두드리며 소리 변화(선명한 두드림 소리 대신 둔탁하고 속이 빈 듯한 "퉁" 소리)를 듣는 방법으로 박리나 표면 아래의 공극을 발견할 수 있습니다. 또한 사선광 아래에서 핀홀, 수지가 부족한 흰색 부분, 주름을 육안으로 확인하고, 코팅 전에 남아 있는 아민 블러시가 없는지 확인합니다. 발견된 결함은 이 단계에서 바로잡습니다 — 해당 부위를 깎아내거나, 다시 함침시키거나, 패치 작업을 하는 방식으로 — 나중에 실패하도록 그대로 코팅해서 덮어두지 않습니다.
16. Safe working practices / 안전 작업 수칙
- Wear gloves and appropriate skin protection when mixing and applying epoxy, since repeated skin contact is a leading cause of epoxy sensitisation, and once sensitised a person can react to even minor future exposure.
- Ensure adequate ventilation when working with epoxy over a large surface area, particularly indoors, since the combined vapour from a large wetted-out area is more significant than from small mixed batches.
- Use dust extraction and respiratory protection when sanding cured epoxy or sheathing, since the resulting fine dust is a respiratory irritant.
- Wear eye protection when mixing, applying, or sanding overhead or at an angle where material can fall or fly toward the face.
- Dispose of resin-soaked mixing cups, rollers, and rags according to workshop and local environmental requirements, since cured epoxy waste and resin-soaked disposables both require appropriate handling.
- Follow correct manual handling and safe access practices when sheathing large panels or working at height or in awkward positions around a hull.
- 에폭시를 배합하고 도포할 때는 장갑과 적절한 피부 보호구를 착용합니다. 반복적인 피부 접촉은 에폭시 알레르기 반응의 주요 원인이며, 한 번 민감해지면 이후 아주 적은 노출에도 반응할 수 있습니다.
- 넓은 표면적에 걸쳐, 특히 실내에서 에폭시 작업을 할 때는 충분한 환기를 확보합니다. 넓게 함침된 면적에서 나오는 증기의 총량은 소량을 배합한 경우보다 훨씬 크기 때문입니다.
- 경화된 에폭시나 시딩을 샌딩할 때는 집진장치와 보호구를 사용합니다. 그로 인해 발생하는 미세분진은 호흡기 자극물입니다.
- 배합·도포·샌딩 작업이 머리 위쪽이거나, 재료가 얼굴 쪽으로 떨어지거나 날아올 수 있는 각도일 때는 눈 보호구를 착용합니다.
- 수지가 묻은 배합컵, 롤러, 걸레는 작업장 및 현지 환경 규정에 따라 폐기합니다. 경화된 에폭시 폐기물과 수지가 묻은 소모품 모두 적절한 처리가 필요합니다.
- 넓은 패널을 시딩하거나 선체 주변에서 고소작업을 하거나 불편한 자세로 작업할 때는 올바른 인력 취급과 안전한 접근 방법을 따릅니다.
'Marine Composites' 카테고리의 다른 글
| Review: MEM25008B 선박 표면·구조물 보수 (0) | 2026.07.30 |
|---|---|
| Review: MEM25007B 선박 표면 유지관리 (0) | 2026.07.29 |
| Review: MEM25005B 선박 목재 부재 제작과 조립 (0) | 2026.07.27 |
| Review: MEM25004B 표면 페어링과 성형 (1) | 2026.07.26 |
| Review: MEM25003B 선박 구조물 셋업 (0) | 2026.07.25 |


