
| 일 | 월 | 화 | 수 | 목 | 금 | 토 |
|---|---|---|---|---|---|---|
| 1 | ||||||
| 2 | 3 | 4 | 5 | 6 | 7 | 8 |
| 9 | 10 | 11 | 12 | 13 | 14 | 15 |
| 16 | 17 | 18 | 19 | 20 | 21 | 22 |
| 23 | 24 | 25 | 26 | 27 | 28 | 29 |
| 30 | 31 |
- TAFE보트빌딩
- 목공 기계
- frp보트
- TAFE
- boat parts explained
- sailing vocabulary
- TAFE Boatbuilding
- boatbuilding
- boat terminology
- 요트제작
- shipwright
- 보트빌딩용어
- boatbuilder education
- marine engineering
- Gel Coat
- 로프팅
- boatyard
- Lofting
- 조선용어
- yacht design basics
- TAFEBoatbuilding
- yachtbuilding
- 보트빌딩
- boatbuilding terms
- marineindustry
- Woodworking Machines
- NCRProcess
- compositeboat
- 선박용어사전
- Study Q&A
- Today
- Total
The Yachtwright’s Legacy
Review: MEM25013B 3차원 플러그·몰드 제작 본문
MEM25013B Produce three-dimensional plugs/moulds
A note on sources
The unit codes and unit titles referenced in this post (e.g., the MEM/MSA codes) come from the Australian TAFE boatbuilding curriculum I studied over two years. Beyond borrowing that name and code, however, the actual written content was substantially researched, reorganised, and rewritten with the help of AI to reflect current boatbuilding practice — it is not a reproduction of any textbook, and in many places it differs significantly from the original course material.
If you are currently studying this unit, please treat this post as a personal study aid and general reference only — not as an accurate substitute for your actual coursework, assessment material, or your instructor's guidance. Always check your own institution's materials for anything that matters for assessment.
출처에 대한 안내
이 글에 언급된 과목 코드와 과목명(예: MEM/MSA 코드)은 제가 2년간 이수한 호주 TAFE 보트빌딩 과정에서 가져온 것입니다. 다만 그 이름과 코드를 가져온 것일 뿐, 실제 본문 내용은 AI의 도움을 받아 현재의 보트빌딩 관행에 맞게 상당 부분 조사하고 재구성하고 다시 쓴 것입니다. 특정 교재를 그대로 옮긴 것이 아니며, 여러 부분에서 원래 교재 내용과 상당히 다릅니다.
이 과목을 현재 수강 중이시라면, 이 글은 개인적인 학습 보조 자료이자 일반적인 참고용으로만 봐 주시고, 실제 수업 자료나 평가 자료, 강사님의 안내를 대신할 정확한 자료로는 여기지 말아 주세요. 평가에 반영되는 내용은 항상 소속 기관의 자료를 통해 확인하시기 바랍니다.
What this unit covers / 이 과목의 범위
MEM25013B deals with the practical skills used to build a plug — a full-size master pattern of the finished part's exact outer shape — from which a production mould is taken. This is the starting point of the entire FRP production process: the plug's surface quality, dimensional accuracy, and shape directly determine the quality of every mould made from it, and therefore of every finished hull or component produced from that mould. Getting the plug wrong is the single most expensive mistake to make in the whole production chain, since correcting it means starting the plug over, not just reworking one part.
MEM25013B는 플러그(plug) — 완성 부품의 정확한 외형을 그대로 본뜬 실물 크기의 원본 패턴 — 를 제작하는 실무 기술을 다룹니다. 이 플러그로부터 양산 몰드를 뜨게 됩니다. 이는 전체 FRP 양산 공정의 출발점으로, 플러그의 표면 품질, 치수 정확도, 형상이 그로부터 만들어지는 모든 몰드의 품질을, 그리고 그 몰드로 생산되는 모든 완성 선체나 부품의 품질을 직접적으로 결정합니다. 플러그를 잘못 만드는 것은 전체 양산 체인에서 가장 값비싼 실수인데, 이를 바로잡으려면 부품 하나를 다시 작업하는 것이 아니라 플러그 자체를 처음부터 다시 만들어야 하기 때문입니다.
Plug Materials & Design / 재료·설계
1. The three-stage production process / 3단계 양산 공정
A typical production FRP boat is built in three distinct stages, each producing a different tool from the one before it: first, a plug is built — a full-size master pattern of the finished shape; second, a mould (a female tool) is laid up directly over the finished plug, capturing its exact shape in reverse; third, the actual production parts (hulls, decks, components) are laid up inside that mould, one after another, each one reproducing the plug's original shape. Understanding this chain matters because any error introduced at the plug stage is inherited by the mould, and then by every single part made from that mould — there is no later stage where a plug error can be corrected without going back to remake the mould.
일반적인 양산 FRP 보트는 세 개의 구분된 단계로 제작되며, 각 단계는 이전 단계에서 서로 다른 툴을 만들어냅니다. 첫째, 플러그를 제작합니다 — 완성 형상의 실물 크기 원본 패턴입니다. 둘째, 완성된 플러그 위에 직접 몰드(암형 툴)를 적층하여 그 정확한 형상을 반전된 형태로 그대로 옮깁니다. 셋째, 실제 양산 부품(선체, 데크, 부품)을 그 몰드 안에 하나씩 차례로 적층하며, 각각이 플러그의 원래 형상을 재현합니다. 이 연쇄 관계를 이해하는 것이 중요한데, 플러그 단계에서 발생한 오류는 몰드에 그대로 물려지고, 이어서 그 몰드로 만드는 모든 개별 부품에도 물려집니다. 몰드를 다시 만드는 것으로 되돌아가지 않고는 나중 단계에서 플러그의 오류를 바로잡을 방법이 없습니다.
2. Materials for a disposable plug / 폐기용 플러그의 재료
Where a plug is only needed to produce a single mould and will not be reused afterwards, it is generally built from inexpensive, easily worked materials rather than durable ones — common choices include rigid foam (polystyrene or polyurethane), MDF or particle board, plaster, timber, or modelling wax. These materials are chosen specifically because they are cheap and fast to cut, carve, and sand into shape, and because a plug that will be thrown away after one mould pull does not need the long-term durability or repeated-use strength that a permanent, reusable plug would require.
플러그가 몰드 하나만 뜨는 데 필요하고 이후 재사용되지 않는 경우, 일반적으로 내구성 있는 재료보다 저렴하고 가공이 쉬운 재료로 제작합니다. 흔히 선택되는 재료로는 단단한 발포재(폴리스티렌 또는 폴리우레탄), MDF나 파티클보드, 석고, 목재, 또는 모델링 왁스가 있습니다. 이러한 재료가 선택되는 특별한 이유는, 저렴하고 빠르게 절삭·조각·샌딩하여 형태를 만들 수 있기 때문이며, 몰드 한 번을 뜨고 나면 버려질 플러그는 영구적이고 반복 사용 가능한 플러그가 요구하는 장기 내구성이나 반복 사용 강도를 필요로 하지 않기 때문입니다.
3. Calculating shrinkage allowance / 수축 허용치 계산
Before the finishing layers (filler, high-build coat, and finish coat) go onto the rough-shaped plug, a shrinkage allowance must be calculated and built into the plug's dimensions. Every resin-based step in the chain — the plug's own finish coat, the mould's laminate, and the finished part's laminate — shrinks slightly as it cures, and that shrinkage compounds across the three stages. If the plug is built to the exact final design dimension with no allowance, the finished production parts will end up slightly undersized once all three stages of shrinkage are accounted for; the plug is therefore deliberately built slightly oversized by a calculated percentage so the final part comes out at the correct design dimension.
러프하게 성형된 플러그에 마감층(필러, 하이빌드 코트, 마감 코트)을 올리기 전에, 수축 허용치를 계산하여 플러그의 치수에 반영해야 합니다. 이 연쇄의 모든 수지 기반 단계 — 플러그 자체의 마감 코트, 몰드의 적층, 완성 부품의 적층 — 는 경화되면서 약간씩 수축하며, 이 수축은 세 단계에 걸쳐 누적됩니다. 플러그를 허용치 없이 최종 설계 치수와 정확히 같게 만들면, 세 단계의 수축이 모두 반영된 후 완성된 양산 부품은 결국 약간 작아지게 됩니다. 따라서 플러그는 계산된 비율만큼 의도적으로 약간 더 크게 제작하여, 최종 부품이 올바른 설계 치수로 나오도록 합니다.

4. Draft angles / 드래프트 각도
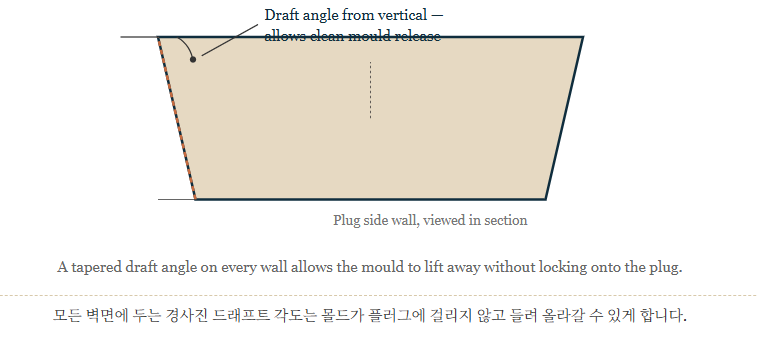
Every surface of a plug that runs roughly parallel to the direction the mould will be pulled away in must instead be built with a slight draft angle (a deliberate taper away from vertical), rather than left perfectly vertical or, worse, undercut. Without draft, a vertical or undercut surface locks the mould onto the plug during release — since the mould has fully wrapped around a section it cannot then slide past — risking damage to the mould, the plug, or both when force is applied to separate them. A consistent draft angle across every such surface allows the mould to lift cleanly away from the plug (and, later, allows every finished part to release cleanly from the mould) without needing to be forced.
플러그에서 몰드가 분리될 방향과 대략 평행하게 이어지는 모든 표면은, 완전히 수직으로 두거나 더 나쁘게는 언더컷(안쪽으로 파인 형태)으로 두는 대신, 약간의 드래프트 각도(수직에서 의도적으로 벌어진 경사)를 두고 제작해야 합니다. 드래프트가 없으면, 수직이거나 언더컷된 표면은 탈형 시 몰드를 플러그에 그대로 고정시켜 버립니다. 몰드가 그 부위를 완전히 감싸고 있어 미끄러져 빠져나올 수 없기 때문입니다. 이는 분리를 위해 힘을 가할 때 몰드, 플러그, 또는 둘 다에 손상을 입힐 위험이 있습니다. 그러한 모든 표면에 일관된 드래프트 각도를 두면, 몰드가 플러그로부터(그리고 이후에는 모든 완성 부품이 몰드로부터) 억지로 힘을 주지 않고도 깨끗하게 분리될 수 있습니다.
Fairing & Finishing / 페어링·마감
5. High-build coats / 하이빌드 코트
Once the rough plug shape is roughly faired with filler, one or more coats of a "high-build" primer/surfacer are applied — a thick, easily sandable coating specifically designed to fill remaining minor imperfections (small scratches, pinholes, and fine texture) that hand-filling alone would be too slow and imprecise to chase individually. After the high-build coat has cured, the correct next step is to sand and fair it back — using a guide coat and longboard, the same technique covered in the fairing and shaping unit — rather than assuming the high-build coat alone has created a finished surface. The high-build coat is a sacrificial, sandable layer, not a finish coat in itself; its entire purpose is to be cut back until the true fair shape underneath is confirmed, since only sanding reveals whether any hollows or high spots still remain.
러프하게 성형된 플러그가 필러로 대략 페어링된 후, "하이빌드(high-build)" 프라이머·서페이서를 한 겹 이상 도포합니다. 이는 손으로 하나씩 채워 나가기에는 너무 느리고 부정확한, 남아 있는 작은 결함(작은 스크래치, 핀홀, 미세한 질감)을 채우도록 특별히 설계된 두껍고 샌딩하기 쉬운 코팅입니다. 하이빌드 코트가 경화된 후, 올바른 다음 단계는 하이빌드 코트 자체가 완성된 표면을 만들어냈다고 가정하는 것이 아니라, 페어링과 성형 과목에서 다룬 것과 동일한 기법인 가이드코트와 롱보드를 사용해 다시 샌딩하고 페어링하는 것입니다. 하이빌드 코트는 그 자체로 마감 코트가 아니라 희생적이고 샌딩 가능한 층이며, 그 전체 목적은 아래에 진정으로 페어한 형상이 확인될 때까지 깎아내는 것입니다. 오목한 부분이나 튀어나온 부분이 여전히 남아 있는지는 샌딩을 해 봐야만 드러나기 때문입니다.
6. Guide coats and fairing boards / 가이드코트와 페어링 보드
A guide coat — a thin, contrasting dust coat sanded off the high spots while remaining visible in the low spots — is the standard sanding aid used to fair a plug, giving an immediate visual map of where more material still needs to come off rather than relying on touch alone. It is used together with a rigid longboard rather than a short block or orbital sander, since only a rigid board reliably cuts material from genuine high points across a broad area without following every small local hollow.
가이드코트 — 높은 지점에서는 샌딩되어 사라지고 낮은 지점에는 그대로 남아 있는, 얇고 대비되는 색의 분말 코팅 — 는 플러그를 페어링할 때 사용하는 표준적인 샌딩 보조 도구로, 촉감에만 의존하지 않고 아직 더 깎아내야 할 부위를 즉각적으로 눈으로 확인할 수 있게 해 줍니다. 짧은 블록이나 오비탈 샌더 대신 단단한 롱보드와 함께 사용하는데, 단단한 보드만이 넓은 영역에 걸쳐 모든 작은 국부적 오목한 부분을 따라가지 않고 실제로 높은 지점의 재료를 안정적으로 깎아내기 때문입니다.
7. Finish sanding grit / 마감 샌딩 그릿
Once the surface is genuinely fair through the high-build stage, finish sanding progresses through increasingly fine grits of wet-and-dry (silicon carbide) sandpaper, used wet to reduce clogging and produce a finer scratch pattern — commonly working up through a sequence such as 400, 600, 800, and up to 1000–1200 grit or finer, depending on the specific finish coat's requirements, before any polishing compound is used. Each grit removes the scratch pattern of the one before it, so skipping grits in the sequence tends to leave deeper scratches that later, finer grits cannot fully remove in a reasonable time.
하이빌드 단계를 통해 표면이 진정으로 페어해지면, 마감 샌딩은 습식·건식(실리콘 카바이드) 사포를 점점 더 고운 그릿으로 진행하며, 목매임을 줄이고 더 미세한 스크래치 패턴을 만들기 위해 물을 사용하는 습식 샌딩으로 작업합니다. 특정 마감 코트의 요구 사항에 따라 다르지만, 보통 400, 600, 800을 거쳐 1000~1200 그릿 또는 그보다 더 고운 그릿까지 순차적으로 진행한 뒤 폴리싱 컴파운드를 사용합니다. 각 그릿은 이전 그릿이 남긴 스크래치 패턴을 제거하므로, 순서를 건너뛰면 더 깊은 스크래치가 남아 이후의 고운 그릿으로는 합리적인 시간 안에 완전히 제거하기 어려운 경우가 많습니다.
8. Resin compatibility between plug and gel coat / 플러그와 젤코트 간 수지 호환성
If a plug has been sealed and finished with epoxy, applying a polyester gel coat directly over that epoxy surface commonly results in the polyester failing to cure properly — it can remain soft, tacky, or only partially hardened, because residual amine components at an epoxy surface can inhibit the proper cure chemistry of polyester or vinylester resin applied directly on top. This is a genuine compatibility problem, not a minor cosmetic issue, and it means the sequence of resin systems used across the plug's construction has to be planned deliberately rather than mixed casually. Where an epoxy-to-polyester transition is unavoidable, a suitable isolating/sealing layer or a change in coating system is needed rather than simply proceeding as though the two resins are interchangeable.
플러그가 에폭시로 실링·마감된 상태에서 그 에폭시 표면 위에 폴리에스터 젤코트를 직접 도포하면, 흔히 폴리에스터가 제대로 경화되지 못하는 결과가 나타납니다. 부드럽거나 끈적하거나 부분적으로만 경화된 상태로 남을 수 있는데, 에폭시 표면에 남아 있는 아민 성분이 그 위에 직접 도포된 폴리에스터나 비닐에스터 수지의 정상적인 경화 화학 반응을 억제할 수 있기 때문입니다. 이는 단순한 미관상의 문제가 아니라 실제 호환성 문제이며, 플러그 제작 전체에 걸쳐 사용하는 수지 시스템의 순서를 무심코 섞어 쓰지 말고 신중하게 계획해야 한다는 것을 의미합니다. 에폭시에서 폴리에스터로의 전환이 불가피한 경우에는, 두 수지가 서로 바꿔 쓸 수 있는 것처럼 그냥 진행하는 대신, 적절한 절연·실링층이나 코팅 시스템의 변경이 필요합니다.
9. The finished plug surface / 완성된 플러그 표면
A finished plug should present a genuinely mirror-like, high-gloss surface, completely free of visible imperfection — no pinholes, scratches, hollows, or humps — since the plug's surface quality is the ceiling, not the floor, for everything produced afterward: a mould can never be smoother or fairer than the plug it was taken from, and a finished part can never be smoother or fairer than the mould it came out of. Any flaw left in the plug, however small it seems at this stage, is reproduced and often magnified in appearance across every subsequent part.
완성된 플러그는 핀홀, 스크래치, 오목한 부분, 튀어나온 부분이 전혀 없는, 진정으로 거울 같은 고광택 표면을 보여야 합니다. 플러그의 표면 품질은 이후 생산되는 모든 것의 상한선이지 하한선이 아니기 때문입니다. 몰드는 그것을 뜬 플러그보다 더 매끄럽거나 더 페어할 수 없으며, 완성 부품은 그것이 나온 몰드보다 더 매끄럽거나 더 페어할 수 없습니다. 이 단계에서 아무리 작아 보이더라도 플러그에 남아 있는 결함은 이후의 모든 부품에 그대로 재현되며, 오히려 겉보기에 더 두드러지는 경우도 많습니다.
10. Cure time and its consequences / 경화 시간과 그 영향
Every coating and filler used on a plug needs its full specified cure time before the next step proceeds, and skipping ahead on a product that has not been left long enough to cure risks several problems at once: continued shrinkage after mould-making (distorting the mould's dimensions after the fact), print-through or surface distortion as the under-cured layer continues to move, poor adhesion of the next coat applied on top, and physical damage such as tearing or gouging during sanding or handling of a still-soft layer. None of these failures are always obvious immediately — some only show up as a dimensional or surface defect much later, once the mould (or a part from it) has already been produced.
플러그에 사용되는 모든 코팅과 필러는 다음 단계로 넘어가기 전에 지정된 전체 경화 시간을 거쳐야 하며, 충분히 경화될 시간을 갖지 못한 제품에서 서둘러 다음 단계로 넘어가면 여러 문제가 동시에 발생할 위험이 있습니다. 몰드 제작 후에도 계속되는 수축(이후에 몰드의 치수를 왜곡시킴), 미경화 층이 계속 움직이면서 생기는 프린트스루나 표면 왜곡, 그 위에 도포되는 다음 코팅의 접착 불량, 그리고 아직 부드러운 층을 샌딩하거나 다루는 과정에서 찢어지거나 파이는 물리적 손상 등입니다. 이러한 실패들이 항상 즉시 명확하게 드러나는 것은 아니며, 일부는 몰드(또는 그로부터 만든 부품)가 이미 생산된 훨씬 나중에야 치수나 표면 결함으로 나타나기도 합니다.
11. Finish coat products / 마감 코트 제품
A range of specialised products can serve as the final, sealed finish coat on a plug — common choices include a tooling gel coat (a purpose-formulated gel coat designed for plug and mould surfaces rather than for finished hulls), a two-pack polyurethane surfacer/topcoat, or a catalysed high-gloss lacquer system — chosen based on compatibility with the resin system that will be used to lay up the mould over it, as well as the level of gloss and durability needed for the number of mould pulls planned.
플러그의 최종 밀봉 마감 코트로 사용할 수 있는 여러 전용 제품이 있습니다. 흔히 선택되는 제품으로는 툴링 젤코트(완성 선체용이 아니라 플러그·몰드 표면용으로 전용 배합된 젤코트), 2액형 폴리우레탄 서페이서·상도, 또는 촉매형 고광택 래커 시스템이 있으며, 그 위에 몰드를 적층할 때 사용할 수지 시스템과의 호환성, 그리고 계획된 몰드 사용 횟수에 필요한 광택과 내구성 수준에 따라 선택합니다.
Tools & Safety / 도구·안전
12. Tools and equipment / 도구 및 장비
| Tool / 도구 | Use / 용도 |
| Longboard / fairing board | Cuts only genuine high points across a broad area, used with a guide coat to fair the plug, as described above. 위에서 설명한 대로, 넓은 영역에서 실제로 높은 지점만을 깎아내며 가이드코트와 함께 플러그를 페어링하는 데 사용됩니다. |
| Guide coat (spray or powder) | Visually maps remaining high and low spots during fairing, as described above. 위에서 설명한 대로, 페어링 중 남아 있는 높은·낮은 지점을 시각적으로 확인할 수 있게 합니다. |
| Wet-and-dry sandpaper | Progressed through fine grits (commonly 400 up to 1000–1200 or finer) for finish sanding before polishing, as described above. 위에서 설명한 대로, 폴리싱 전 마감 샌딩을 위해 고운 그릿(보통 400에서 1000~1200 또는 그 이상)까지 순차적으로 사용됩니다. |
| Moisture/cure indicator, timer | Confirms each coating has reached its specified cure time before the next step proceeds, rather than relying on a rushed guess. 서둘러 추측하는 대신, 각 코팅이 다음 단계로 넘어가기 전에 지정된 경화 시간에 도달했는지 확인합니다. |
| Buffer/polisher | Brings the finish-sanded surface up to the final high-gloss, mirror-like finish required of a plug. 마감 샌딩된 표면을 플러그에 요구되는 최종 고광택, 거울 같은 마감으로 끌어올립니다. |
13. Safe working practices / 안전 작업 수칙
- Use dust extraction and appropriate respiratory protection when sanding filler, high-build coats, or cured resin, since the resulting fine dust is a respiratory irritant.
- Wear gloves and appropriate skin protection when mixing and applying epoxy, polyester, or polyurethane products, since repeated skin contact with any of these systems can cause irritation or sensitisation over time.
- Ensure adequate ventilation when applying gel coat, high-build coats, or two-pack polyurethane products, particularly in an enclosed workshop.
- Wear eye protection when sanding, buffing, or grinding, especially overhead or at an angle where dust and debris can travel toward the face.
- Confirm any product's specific cure and safety data sheet before mixing an unfamiliar catalyst or hardener system for the first time, since ratios and handling precautions vary between manufacturers.
- Follow safe manual handling practices when moving or repositioning a large plug, given its size and often awkward shape.
- 필러, 하이빌드 코트, 또는 경화된 수지를 샌딩할 때는 집진장치와 적절한 호흡 보호구를 사용합니다. 그로 인해 발생하는 미세분진은 호흡기 자극물입니다.
- 에폭시, 폴리에스터, 또는 폴리우레탄 제품을 배합하고 도포할 때는 장갑과 적절한 피부 보호구를 착용합니다. 이러한 시스템 중 어느 것이든 반복적으로 피부에 접촉하면 시간이 지나면서 자극이나 알레르기 반응을 일으킬 수 있습니다.
- 특히 밀폐된 작업장에서 젤코트, 하이빌드 코트, 또는 2액형 폴리우레탄 제품을 도포할 때는 충분한 환기를 확보합니다.
- 샌딩, 버핑, 연삭 작업을 할 때, 특히 머리 위쪽이나 분진·이물질이 얼굴 쪽으로 날아올 수 있는 각도에서는 눈 보호구를 착용합니다.
- 익숙하지 않은 촉매나 경화제 시스템을 처음 배합하기 전에는 해당 제품의 경화 및 안전 데이터를 반드시 확인합니다. 배합비와 취급 주의사항은 제조사마다 다릅니다.
- 큰 플러그를 옮기거나 재배치할 때는 그 크기와 종종 다루기 어려운 형상을 고려해 안전한 인력 취급 수칙을 따릅니다.
Questions with Answers / 문제와 답안
The questions below have been paraphrased from the original unit material into different wording, for personal study use, and each is followed by a short model answer.
아래 문제들은 원 과목 자료의 내용을 개인 학습용으로 다른 문장으로 바꾸어 쓴 것이며, 각 문제 아래에 간단한 모범 답안을 함께 실었습니다.
'Marine Composites' 카테고리의 다른 글
| Review: MSAENV272B 환경적으로 지속가능한 작업 실천에 참여하기 (0) | 2026.08.03 |
|---|---|
| Review: MEM25015A 장비·부속기기 조립 및 설치 (0) | 2026.08.02 |
| Review: MEM25010B 선박 피트아웃(의장) 작업 (0) | 2026.07.31 |
| Review: MEM25008B 선박 표면·구조물 보수 (0) | 2026.07.30 |
| Review: MEM25007B 선박 표면 유지관리 (0) | 2026.07.29 |


