
| 일 | 월 | 화 | 수 | 목 | 금 | 토 |
|---|---|---|---|---|---|---|
| 1 | ||||||
| 2 | 3 | 4 | 5 | 6 | 7 | 8 |
| 9 | 10 | 11 | 12 | 13 | 14 | 15 |
| 16 | 17 | 18 | 19 | 20 | 21 | 22 |
| 23 | 24 | 25 | 26 | 27 | 28 | 29 |
| 30 | 31 |
- TAFE Boatbuilding
- 로프팅
- yacht design basics
- 목공 기계
- TAFE보트빌딩
- boat terminology
- 조선용어
- 보트빌딩용어
- Woodworking Machines
- boatbuilding
- boat parts explained
- boatbuilding terms
- frp보트
- TAFEBoatbuilding
- 보트빌딩
- boatyard
- boatbuilder education
- Lofting
- compositeboat
- marineindustry
- sailing vocabulary
- 선박용어사전
- shipwright
- TAFE
- Gel Coat
- NCRProcess
- marine engineering
- Study Q&A
- 요트제작
- yachtbuilding
- Today
- Total
The Yachtwright’s Legacy
Review: MEM25004B 표면 페어링과 성형 본문
MEM25004B Fair and shape surfaces
A note on sources
The unit codes and unit titles referenced in this post (e.g., the MEM/MSA codes) come from the Australian TAFE boatbuilding curriculum I studied over two years. Beyond borrowing that name and code, however, the actual written content was substantially researched, reorganised, and rewritten with the help of AI to reflect current boatbuilding practice — it is not a reproduction of any textbook, and in many places it differs significantly from the original course material.
If you are currently studying this unit, please treat this post as a personal study aid and general reference only — not as an accurate substitute for your actual coursework, assessment material, or your instructor's guidance. Always check your own institution's materials for anything that matters for assessment.
출처에 대한 안내
이 글에 언급된 과목 코드와 과목명(예: MEM/MSA 코드)은 제가 2년간 이수한 호주 TAFE 보트빌딩 과정에서 가져온 것입니다. 다만 그 이름과 코드를 가져온 것일 뿐, 실제 본문 내용은 AI의 도움을 받아 현재의 보트빌딩 관행에 맞게 상당 부분 조사하고 재구성하고 다시 쓴 것입니다. 특정 교재를 그대로 옮긴 것이 아니며, 여러 부분에서 원래 교재 내용과 상당히 다릅니다.
이 과목을 현재 수강 중이시라면, 이 글은 개인적인 학습 보조 자료이자 일반적인 참고용으로만 봐 주시고, 실제 수업 자료나 평가 자료, 강사님의 안내를 대신할 정확한 자료로는 여기지 말아 주세요. 평가에 반영되는 내용은 항상 소속 기관의 자료를 통해 확인하시기 바랍니다.
What this unit covers / 이 과목의 범위
MEM25004B deals with the practical skills used to take a structurally complete hull or component surface — one that may still carry minor irregularities from moulding, lay-up, or panel joining — and bring it to a genuinely fair, smooth surface ready for priming, gel coat touch-up, or final paint. This covers selecting and applying the right filler or fairing compound for the job, shaping it back with longboards and sanders, and using guide coats and light to actually verify fairness rather than relying on touch or eye alone. It follows on directly from the setting-out and structural units, since a structure that was set up and erected fairly gives the fairing stage far less work to correct.
MEM25004B은 몰딩, 적층, 또는 패널 접합 과정에서 남아 있을 수 있는 사소한 요철이 있는, 구조적으로는 완성된 선체나 부품 표면을 프라이머·젤코트 터치업·최종 도장이 가능한 진정으로 매끄러운 표면으로 만드는 실무 기술을 다룹니다. 작업에 맞는 필러나 페어링 컴파운드를 선택하고 도포하는 것, 롱보드와 샌더로 다시 깎아 형태를 잡는 것, 그리고 촉감이나 눈대중에만 의존하지 않고 가이드코트와 빛을 이용해 실제로 페어니스를 검증하는 것까지 포함합니다. 이는 세팅아웃 및 구조 관련 과목들 바로 다음에 이어지는데, 구조가 처음부터 페어하게 세팅되고 설치되었다면 페어링 단계에서 바로잡아야 할 작업량이 훨씬 줄어들기 때문입니다.
Fillers & Fairing Compounds / 필러
1. Choosing a filler or fairing compound / 필러·페어링 컴파운드 선택
Not every filler is suited to every job, and choosing the wrong one wastes material and rework time. Broadly:
- Epoxy fairing compound (microballoon/microsphere-filled) — lightweight, low shrinkage, sands easily, and bonds well to both epoxy and (with correct surface prep) polyester laminates; the common choice for structural fairing over larger areas on modern builds.
- Polyester body filler — cures fast, cheap, and widely available, but heavier, shrinks more over time, and bonds best to polyester substrates specifically — a mismatch with an epoxy hull can lead to poor long-term adhesion.
- Gel coat putty/paste — a thickened, colour-matched gel coat used for small cosmetic repairs and pinhole filling right at the surface, rather than for structural fairing of larger areas.
모든 필러가 모든 작업에 적합한 것은 아니며, 잘못된 필러를 선택하면 재료와 재작업 시간이 낭비됩니다. 대략적으로 다음과 같습니다.
- 에폭시 페어링 컴파운드(마이크로볼룬·마이크로스피어 충전) — 가볍고, 수축이 적으며, 샌딩이 쉽고, 에폭시는 물론 (적절한 표면 처리 시) 폴리에스터 적층재에도 접착이 잘 됩니다. 현대 건조에서 넓은 면적의 구조적 페어링에 흔히 선택됩니다.
- 폴리에스터 바디 필러 — 경화가 빠르고 저렴하며 구하기 쉽지만, 더 무겁고 시간이 지나면서 수축이 더 크며, 특히 폴리에스터 기재에 접착이 가장 잘 됩니다. 에폭시 선체와 함께 사용하면 장기적으로 접착 불량이 발생할 수 있습니다.
- 젤코트 퍼티/페이스트 — 색을 맞춘 걸쭉한 젤코트로, 넓은 면적의 구조적 페어링보다는 표면의 작은 미관상 보수나 핀홀 메움에 사용됩니다.
2. Mixing and pot life / 배합과 가용시간(pot life)
Filler is mixed to the manufacturer's stated ratio — by weight where possible, since volume measurement is less accurate for thick pastes — and only in a quantity that can be applied within its pot life before it begins to gel. Mixing too much at once is a common beginner mistake: it wastes material and forces rushed, poorly worked application as the batch starts to kick off. Pot life shortens significantly in warm weather and lengthens in cool weather, so batch size should be adjusted for workshop temperature on the day, not assumed from habit.
필러는 제조사가 지정한 배합비에 따라 혼합하며, 가능하면 중량 기준으로 배합합니다. 걸쭉한 페이스트는 부피 측정의 정확도가 떨어지기 때문입니다. 배합량은 겔화가 시작되기 전, 가용시간(pot life) 안에 도포할 수 있는 양만큼만 섞어야 합니다. 한 번에 너무 많이 섞는 것은 초보자에게 흔한 실수로, 재료를 낭비하고 배치가 경화되기 시작하면서 서둘러 부실하게 도포하게 만듭니다. 가용시간은 더운 날씨에는 크게 짧아지고 서늘한 날씨에는 길어지므로, 배합량은 습관적으로 정하지 말고 그날의 작업장 온도에 맞춰 조정해야 합니다.
3. Application in thin layers / 얇은 층으로 도포
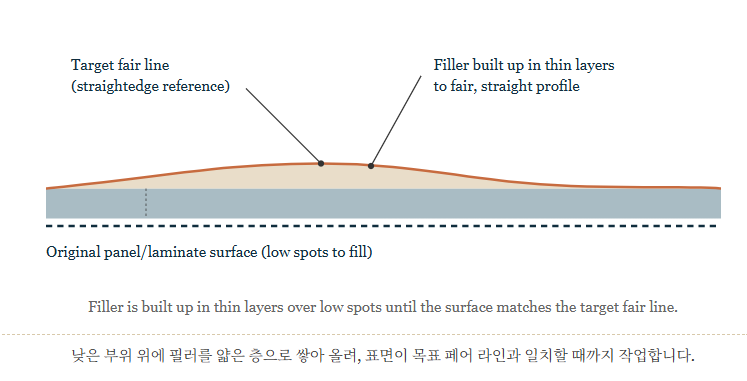
Filler is applied with a flexible spreader or squeegee in thin layers — building up thickness over several applications rather than one thick pass — because a thick single application generates more exothermic heat and shrinks more as it cures, which risks cracking, pinholing, or the filler pulling away from the substrate at the edges. Each layer is allowed to cure before the next is applied or before shaping begins, and any area needing more than roughly 5–6 mm of build-up is generally better addressed structurally (reshaping the underlying laminate or panel) rather than filled that deep.
필러는 유연한 스프레더나 스퀴지로 얇은 층으로 도포하며, 한 번에 두껍게 바르는 대신 여러 번에 걸쳐 두께를 쌓아 올립니다. 한 번에 두껍게 도포하면 경화 중 발열이 더 커지고 수축도 더 커져, 균열, 핀홀, 또는 가장자리에서 필러가 기재로부터 떨어지는 문제가 발생할 위험이 있기 때문입니다. 각 층은 다음 층을 바르거나 형태를 잡기 시작하기 전에 충분히 경화되도록 두며, 대략 5~6mm를 넘는 두께가 필요한 부위는 그만큼 깊게 필러를 채우기보다는 구조적으로 해결(아래 적층재나 패널 자체를 다시 성형)하는 것이 일반적으로 더 바람직합니다.
Shaping Techniques / 성형 기법
4. Rough shaping vs fine fairing / 러프 성형과 파인 페어링
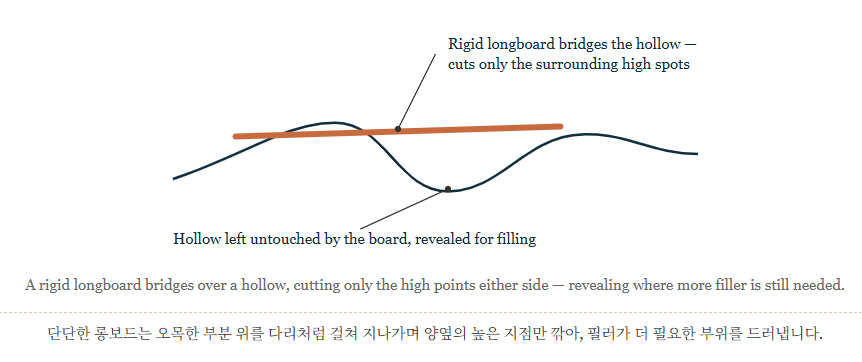
Shaping generally happens in two distinct stages. Rough shaping removes the bulk of excess cured filler quickly, typically with a coarser grit and a more aggressive tool (such as a cheese-grater-style Surform or coarse disc sander), to bring the surface roughly down to shape without yet worrying about a perfect fair line. Fine fairing follows, working in progressively finer grits with a long, rigid board that bridges across the surface, removing only the remaining high points until the whole area reads consistently fair.
성형은 일반적으로 두 단계로 구분되어 이루어집니다. 러프 성형(rough shaping)은 경화된 여분의 필러를 빠르게 제거하는 단계로, 보통 거친 그릿과 더 공격적인 공구(치즈 그레이터 형태의 서폼이나 거친 디스크 샌더 등)를 사용하여, 아직 완벽한 페어 라인을 신경 쓰지 않고 표면을 대략적인 형태로 낮춥니다. 이어지는 파인 페어링(fine fairing)은 표면을 가로질러 걸쳐지는 길고 단단한 보드를 사용해 점점 더 고운 그릿으로 작업하며, 전체 영역이 일관되게 페어하게 느껴질 때까지 남아 있는 높은 지점만을 제거합니다.
5. The longboard technique / 롱보드 기법
A longboard (or fairing board) is a rigid, flat board — often 300–900 mm long depending on the panel size — with sandpaper mounted along its length, used precisely because its rigidity means it can only cut material where the surface is actually high; it cannot follow a hollow the way a short block or an orbital sander can. Worked in long, overlapping strokes at a shallow angle across the surface — never in one direction only, but alternating diagonally — a longboard reveals and removes high spots evenly, while a short board or hand-held orbital sander tends to follow every local bump and hollow, making the surface feel smooth locally while leaving it genuinely unfair over a longer span.
롱보드(페어링 보드)는 단단하고 평평한 보드로, 패널 크기에 따라 보통 300~900mm 길이이며 길이 방향을 따라 사포가 부착되어 있습니다. 이 도구가 정확히 이런 형태인 이유는, 그 강성 때문에 표면이 실제로 높은 부위에서만 재료를 깎을 수 있기 때문입니다. 짧은 블록이나 오비탈 샌더처럼 오목한 부위를 따라가지 못합니다. 표면을 얕은 각도로 길고 겹치는 스트로크로 작업하되(한 방향으로만이 아니라 대각선 방향을 번갈아 가며) 사용하면, 롱보드는 높은 지점을 고르게 드러내고 제거합니다. 반면 짧은 보드나 손으로 잡는 오비탈 샌더는 국부적인 모든 돌기와 오목한 부분을 그대로 따라가는 경향이 있어, 표면이 국부적으로는 매끄럽게 느껴져도 더 넓은 범위에서는 실제로는 페어하지 않은 상태로 남게 됩니다.
6. Grit progression / 그릿 진행 순서
Sanding generally progresses through a sequence of grits rather than jumping straight to a fine finish, since each grit removes the scratch pattern of the one before it. A typical progression for fairing work might run from a coarse grit (around 40–80) for initial shaping, through a medium grit (around 120–180) for the main longboard fairing pass, to a finer grit (around 220–320) for the final surface preparation immediately before priming or gel coat — though the exact sequence always depends on the specific filler, primer, or coating system's technical data sheet.
샌딩은 보통 곧바로 고운 마감으로 건너뛰지 않고 그릿을 순차적으로 진행하는데, 각 그릿이 이전 그릿이 남긴 스크래치 패턴을 제거하기 때문입니다. 페어링 작업의 일반적인 진행 순서는 초기 성형에는 거친 그릿(약 40~80), 주요 롱보드 페어링 작업에는 중간 그릿(약 120~180), 프라이머나 젤코트 도포 직전 최종 표면 준비에는 더 고운 그릿(약 220~320) 순으로 진행하는 것이지만, 정확한 순서는 항상 사용하는 필러, 프라이머, 도장 시스템의 기술자료에 따라 달라집니다.
7. Working curved and complex surfaces / 곡면과 복잡한 형상 작업
Flat longboards handle broad, gently curved hull panels well, but tighter curves — such as around a bow, a turn of bilge, or a moulded corner — need a flexible board or a smaller radius tool that can follow the curve without either bridging over it (leaving hollows uncorrected) or digging into it (creating new hollows). On genuinely compound curves, fairing is often checked and worked in smaller sections at a time, with more frequent guide-coat or straightedge checks, since a single long tool cannot reliably read fairness across a surface that curves in two directions at once.
평평한 롱보드는 완만하게 굽은 넓은 선체 패널에는 잘 맞지만, 뱃머리 부위, 빌지가 꺾이는 부분, 성형된 모서리처럼 곡률이 급한 부위에는 유연한 보드나 더 작은 반경의 공구가 필요합니다. 그래야 곡면 위를 다리처럼 걸쳐 지나가며 오목한 부분을 그대로 남기거나(브리징), 반대로 파고들어 새로운 오목한 부분을 만드는 것을 피할 수 있습니다. 실제로 복합 곡률을 가진 부위에서는 한 번에 더 작은 구간으로 나누어 페어링을 점검하고 작업하며, 가이드코트나 직선자 확인을 더 자주 진행하는 경우가 많습니다. 하나의 긴 공구로는 동시에 두 방향으로 굽어 있는 표면의 페어니스를 안정적으로 읽어낼 수 없기 때문입니다.
Checking Fairness / 페어니스 검사
8. Guide coats / 가이드코트
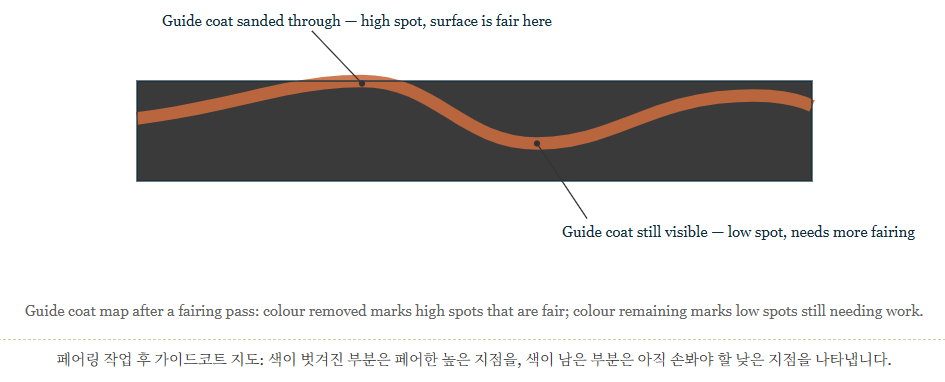
A guide coat is a thin, contrasting-coloured dry-dust coat (traditionally a dark powder or spray) applied lightly over the whole surface before a fairing pass. As the surface is sanded, the guide coat sands away first from the high spots while remaining visible in the low spots — giving an immediate, visual map of where the surface is not yet fair, without needing to rely purely on touch. Sanding continues, reapplying guide coat between passes, until it sands away evenly across the whole surface in one pass, confirming a consistently fair result.
가이드코트는 페어링 작업 전에 표면 전체에 얇게 도포하는, 대비되는 색상의 건조 분말 코팅(전통적으로 어두운 색 파우더나 스프레이)입니다. 표면을 샌딩하면 가이드코트는 높은 지점에서 먼저 벗겨지고 낮은 지점에는 그대로 남아, 촉감에만 의존하지 않고도 표면 중 아직 페어하지 않은 부위를 즉각적으로 눈으로 확인할 수 있게 해 줍니다. 샌딩 사이사이에 가이드코트를 다시 도포하면서 작업을 계속하며, 한 번의 샌딩 패스로 전체 표면에서 고르게 벗겨질 때까지 반복하여 일관되게 페어한 결과를 확인합니다.
9. Straightedge and batten checks / 직선자와 배튼 확인
A rigid straightedge (for flat or gently curved panels) or a flexible fairing batten (for curved hull sections) is laid directly against the surface and sighted for gaps at either end. A consistent, hairline-thin gap running the full length usually just reflects the surface's intended curvature and is acceptable; an uneven gap that opens and closes at specific points reveals a local hollow or hump that still needs attention. This check is best done from more than one direction across the same area, since a surface can appear fair along one axis while still being unfair along another.
단단한 직선자(평평하거나 완만하게 굽은 패널용) 또는 유연한 페어링 배튼(곡면 선체 구간용)을 표면에 직접 대고, 양 끝에서 틈을 육안으로 확인합니다. 전체 길이에 걸쳐 일정하고 머리카락처럼 얇은 틈이 있다면 이는 보통 표면이 의도한 곡률을 반영하는 것으로 문제가 없습니다. 특정 지점에서 벌어졌다 좁아졌다 하는 불균일한 틈은 여전히 손봐야 할 국부적인 오목한 부분이나 튀어나온 부분을 드러냅니다. 이 확인은 같은 부위를 두 방향 이상에서 진행하는 것이 좋은데, 한 축을 따라서는 페어해 보여도 다른 축을 따라서는 여전히 언페어할 수 있기 때문입니다.
10. Raking light and the palm check / 사선광 확인과 손바닥 확인
Raking (low-angle, sideways) light cast across a surface — natural sunlight at a low angle, or a portable work light held close and low — throws shadows into even very shallow hollows and highlights along even very slight humps, often revealing unfairness that is invisible when the surface is lit straight-on. A flat, open palm run lightly and slowly across the surface, rather than fingertips, is the traditional final check, since an open palm bridges small local texture the way fingertips do not, and is more sensitive to a broad, gentle wave in the surface than the eye alone.
표면을 가로질러 낮은 각도(측면)로 비추는 사선광 — 낮게 뜬 자연광이나, 표면 가까이 낮게 잡은 휴대용 작업등 — 은 매우 얕은 오목한 부분에도 그림자를 만들고 아주 미세한 돌기에도 밝은 하이라이트를 만들어, 정면에서 조명을 받을 때는 보이지 않는 언페어니스를 자주 드러냅니다. 손끝이 아니라 평평하게 편 손바닥을 표면 위에 가볍고 천천히 문지르는 것은 전통적인 최종 확인 방법으로, 손바닥은 손끝과 달리 작은 국부적 질감을 다리처럼 걸쳐 지나가며, 눈으로만 볼 때보다 표면의 넓고 완만한 물결을 더 민감하게 감지할 수 있습니다.
Tools & Safety / 도구·안전
11. Tools and equipment / 도구 및 장비
| Tool / 도구 | Use / 용도 |
| Longboard / fairing board | Rigid board carrying sandpaper along its length, used to identify and remove high spots evenly across a broad area without following local hollows. 길이 방향을 따라 사포가 부착된 단단한 보드로, 국부적인 오목한 부분을 따라가지 않고 넓은 영역에 걸쳐 높은 지점을 고르게 찾아내고 제거하는 데 사용됩니다. |
| Flexible fairing board | A springier board used on tighter curves where a rigid longboard cannot follow the surface without bridging incorrectly. 단단한 롱보드가 표면을 잘못 브리징하지 않고는 따라갈 수 없는 급한 곡면에 사용하는, 더 유연한 보드입니다. |
| Orbital / random-orbit sander | Used for rough shaping and final fine-grit finishing over small, already-fair areas — not for the main fairing pass, since it tends to follow local surface texture. 러프 성형과, 이미 페어한 작은 영역의 최종 고운 마감에 사용됩니다. 국부적인 표면 질감을 그대로 따라가는 경향이 있어 주요 페어링 작업에는 사용하지 않습니다. |
| Surform / cheese-grater tool | Coarse hand tool for quickly removing bulk excess cured filler during the rough shaping stage. 러프 성형 단계에서 경화된 여분의 필러를 빠르게 대량으로 제거하는 거친 수공구입니다. |
| Guide coat (spray or powder) | Thin, contrasting dust coat applied before sanding to visually map high and low spots, as described above. 위에서 설명한 대로, 샌딩 전에 도포하여 높은 지점과 낮은 지점을 시각적으로 확인할 수 있게 하는 얇고 대비되는 색의 분말 코팅입니다. |
| Straightedge/fairing batten | Used to physically check for gaps that reveal remaining unfairness, as described above. 위에서 설명한 대로, 남아 있는 언페어니스를 드러내는 틈을 물리적으로 확인하는 데 사용됩니다. |
| Dust extraction/vacuum sander | Removes sanding dust at the point of generation, improving visibility, air quality, and finish quality by reducing dust resettling into the work. 발생 지점에서 샌딩 분진을 제거하여 시야와 공기질을 개선하고, 분진이 작업면에 다시 내려앉는 것을 줄여 마감 품질을 높입니다. |
12. Safe working practices / 안전 작업 수칙
- Wear a properly fitted respirator rated for the specific dust being generated — cured epoxy, polyester filler, and gel coat dusts are all respiratory irritants, and some fillers contain crystalline silica, which requires a higher level of respiratory protection.
- Wear eye protection at all times when sanding or grinding overhead or at an angle where dust and debris can fall or fly toward the face.
- Use local dust extraction or a vacuum sander wherever practical, rather than relying on general workshop ventilation alone.
- Wear gloves and appropriate skin protection when mixing and applying wet filler, since uncured resin systems can cause skin irritation or sensitisation.
- Take regular breaks and vary tool grip/posture during extended longboarding, since it is a repetitive, physically demanding task that carries a risk of manual handling strain over a full shift.
- Keep guide coat, solvent, and filler containers sealed when not in use, and store and dispose of sanding dust and offcuts according to workshop and local environmental requirements.
- 발생하는 분진의 종류에 맞게 등급이 지정된, 제대로 맞는 방진 마스크를 착용합니다. 경화된 에폭시, 폴리에스터 필러, 젤코트 분진은 모두 호흡기 자극물이며, 일부 필러에는 결정형 실리카가 포함되어 있어 더 높은 수준의 호흡 보호구가 필요합니다.
- 머리 위쪽이나, 분진과 이물질이 얼굴 쪽으로 떨어지거나 날아올 수 있는 각도에서 샌딩이나 연삭 작업을 할 때는 항상 눈 보호구를 착용합니다.
- 일반적인 작업장 환기에만 의존하지 말고, 가능하면 국소 집진 장치나 진공 샌더를 사용합니다.
- 젖은 필러를 배합하고 도포할 때는 장갑과 적절한 피부 보호구를 착용합니다. 미경화 수지 시스템은 피부 자극이나 알레르기 반응을 일으킬 수 있습니다.
- 장시간 롱보딩 작업 중에는 정기적으로 휴식을 취하고 공구를 쥐는 방식과 자세를 바꿉니다. 이는 반복적이고 신체적으로 부담이 큰 작업으로, 근무 시간 전체에 걸쳐 인력 취급 부담이 누적될 위험이 있습니다.
- 가이드코트, 용제, 필러 용기는 사용하지 않을 때 밀봉해 두고, 샌딩 분진과 자투리 재료는 작업장 및 현지 환경 규정에 따라 보관·폐기합니다.
'Marine Composites' 카테고리의 다른 글
| Review: MEM25006B 선박 시딩(외피 보강) 작업 (0) | 2026.07.28 |
|---|---|
| Review: MEM25005B 선박 목재 부재 제작과 조립 (0) | 2026.07.27 |
| Review: MEM25003B 선박 구조물 셋업 (0) | 2026.07.25 |
| Review: MEM25002B 섬유강화 구조물 성형 및 접합 (0) | 2026.07.23 |
| Review: MEM18002B 전동 공구 사용 (0) | 2026.07.21 |


