

| 일 | 월 | 화 | 수 | 목 | 금 | 토 |
|---|---|---|---|---|---|---|
| 1 | 2 | 3 | 4 | |||
| 5 | 6 | 7 | 8 | 9 | 10 | 11 |
| 12 | 13 | 14 | 15 | 16 | 17 | 18 |
| 19 | 20 | 21 | 22 | 23 | 24 | 25 |
| 26 | 27 | 28 | 29 | 30 | 31 |
- sailing vocabulary
- 보트빌딩용어
- TAFE
- Woodworking Machines
- boat terminology
- boatyard
- 로프팅
- TAFE보트빌딩
- boatbuilder education
- TAFE Boatbuilding
- boat parts explained
- 보트빌딩
- 목공 기계
- NCRProcess
- shipwright
- yacht design basics
- Lofting
- Study Q&A
- frp보트
- 조선용어
- marine engineering
- boatbuilding
- boatbuilding terms
- 선박용어사전
- 요트제작
- marineindustry
- 선박용어
- compositeboat
- yachtbuilding
- TAFEBoatbuilding
- Today
- Total
The Yachtwright’s Legacy
Review: MEM12007D 구조물 및 형상의 치수 표시와 마킹 본문
MEM12007D Mark off/out structural fabrications and shapes
MEM12007D는 구조물 마킹과 로프팅의 실용적 기술을 다룹니다.
Part 1 — English
MEM12007D is about the precision work that happens before any cutting or welding begins: marking out the exact shapes and positions of structural components onto material or a lofting floor. Get this step wrong, and every subsequent operation is wrong. The unit covers the tools, geometry, and procedures for accurate marking out, as well as the WHS and housekeeping practices that make it safe.
Part 2 — 한국어
MEM12007D는 절단이나 용접이 시작되기 전에 이루어지는 정밀 작업 — 구조 부품의 정확한 형태와 위치를 재료나 로프팅 플로어에 마킹하는 것을 다룬다. 이 단계가 잘못되면 이후 모든 작업이 틀어진다.
Mark Off / Out Structural Fabrications and Shapes
Accurate marking out is where precision begins. Before any material is cut, bent, or welded, someone has to transfer exact dimensions from a drawing onto the material or the lofting floor. Every error at this stage multiplies through everything that follows. This unit is about doing that transfer correctly — and safely.
정확한 제작은 정확한 표시 작업에서 시작된다. 재료를 절단하거나 굽히고, 조립하거나 용접하기 전에 도면에 있는 치수와 형상을 실제 자재나 로프팅 바닥 위에 정확하게 옮겨야 한다. 이 단계에서 발생한 작은 오차 하나는 이후 모든 공정에 영향을 미치며, 최종 결과물의 품질까지 좌우하게 된다. 이 과정은 도면의 정보를 실제 작업물 위에 정확하고 안전하게 전개하는 방법을 배우는 데 목적이 있다. 측정 도구의 올바른 사용법부터 기준선 설정, 치수 표시, 곡선 형상의 마킹까지 실제 제작 과정의 기초가 되는 기술들을 익히게 된다.
📌 Content note: This unit's content is drawn from the published MEM12007D competency standards and established marking-out and lofting practice. The Revision Questions have been paraphrased in my own wording to avoid copyright issues — the answers remain technically accurate.
📌 내용 안내: 이 유닛의 내용은 MEM12007D 역량 기술서와 확립된 마킹아웃·로프팅 실무를 바탕으로 한다. Revision Questions는 저작권 문제 방지를 위해 내 표현으로 바꿔 작성했다.
① WHS and Preparing the Lofting Area · WHS 및 로프팅 구역 준비
🇬🇧 Why preparation matters
A lofting floor must be flat, clean, and clearly lit. Dust and debris on the surface cause errors; a cluttered floor creates trip hazards. WHS obligations must be met before any marking work begins — not as an afterthought. The lofting floor is both a precision instrument and a work area: treat it as both.
🇰🇷 준비가 중요한 이유
로프팅 플로어는 평평하고 청결하며 조명이 충분해야 한다. 표면의 먼지와 잔재는 오류를 유발하고, 어수선한 바닥은 넘어짐 위험을 만든다. WHS 의무는 어떤 마킹 작업이 시작되기 전에 충족되어야 한다 — 나중에 생각하는 것이 아니다.

Key marking-out tools · 핵심 마킹아웃 도구
- Chalk line (snap line): Produces long, straight reference lines on floors and sheet materials
- Steel square / try square: Sets and verifies 90° angles between lines
- Steel rule/tape: Linear measurement — use rigid rule for short dimensions
- Scriber/marking knife: Scratches fine precise lines on metal and timber
- Dividers/trammel points: Transferring measurements and scribing arcs
- Flexible batten: Fairing curves through plotted points
- 분필선(스냅 라인): 바닥과 판재에 긴 직선 기준선 생성
- 강철 스퀘어: 선 사이의 90° 각도 설정 및 검증
- 강철 자/줄자: 길이 측정 — 짧은 치수는 강직한 자 사용
- 스크라이버/마킹 나이프: 금속·목재에 미세하고 정확한 선 긁기
- 디바이더/트라멜 포인트: 치수 전사와 호 그리기
- 유연한 배튼: 플로팅된 점들을 통해 곡선 페어링
② Datum Points and Grid Lines · 기준점과 격자선
🇬🇧 Everything starts from datum
Before any shape can be marked out, a reference system must be established. The datum (plural: datums or data) is the fixed origin point from which all other measurements are taken. On a lofting floor, this is usually the intersection of the baseline and the centreline. Every other point is located relative to this origin.
🇰🇷 모든 것은 기준점에서 시작한다
어떤 형태를 마킹하기 전에 기준 시스템을 설정해야 한다. 기준점(datum)은 다른 모든 측정이 취해지는 고정된 원점이다. 로프팅 플로어에서 이것은 보통 기준선(baseline)과 중심선(centreline)의 교차점이다.

Squaring station lines — the 3-4-5 rule · 스테이션 선 직각 확인 — 3-4-5 법칙
After marking a station line, it must be verified as truly square (90°) to the baseline. The most reliable method — without a large square — is the 3-4-5 triangle, which is based on the Pythagorean theorem: a² + b² = c².
스테이션 선을 마킹한 후 기준선에 진정으로 직각(90°)인지 검증해야 한다. 큰 스퀘어 없이 가장 신뢰할 수 있는 방법은 피타고라스 정리(a² + b² = c²)에 기반한 3-4-5 삼각형이다.
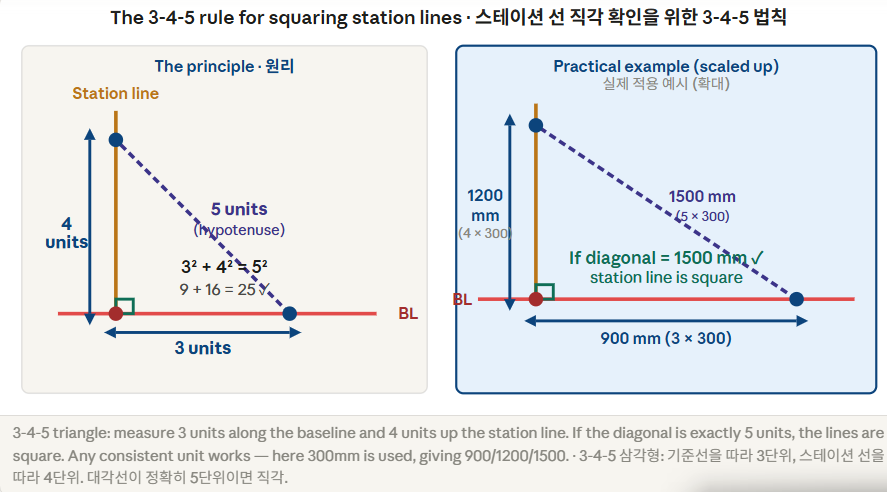
💡큰 배수가 더 정확하다: 삼각형이 클수록 더 정확한 확인이 가능하다. 300mm 단위 사용(= 900/1200/1500mm)이 30mm 단위보다 신뢰적이다.
Where datum points come from · 기준점의 출처
🇬🇧 Sourcing datum points
Datum points are taken from the original design drawing or the offsets table. The designer establishes the coordinate system — typically baseline (often the keel line or underside of the structure) and centreline (fore-aft centreline of the vessel). These become the physical reference lines on the lofting floor. Every other plotted point is a specified distance from these two lines.
🇰🇷 기준점의 출처
기준점은 원본 설계 도면 또는 옵셋 테이블에서 가져온다. 설계자가 좌표 시스템을 확립한다 — 보통 기준선(킬 라인 또는 구조물 하부)과 중심선(선박의 전후 중심선). 이것이 로프팅 플로어의 물리적 기준선이 된다. 모든 다른 플로팅 점은 이 두 선으로부터 지정된 거리에 있다.
③ Developing and Lifting Templates · 템플릿 개발과 추출
🇬🇧 What a template does
A template is a physical copy of a shape lifted from the lofting floor — it is then used to mark that exact shape onto the actual material. There are two main types: stick templates (made from thin battens or rod, light and adjustable) and solid templates (made from thin sheet material such as plywood or hardboard, more rigid and durable). In boatbuilding, stick templates are common for frame shapes.
🇰🇷 템플릿의 역할
템플릿은 로프팅 플로어에서 들어올린 형태의 물리적 복사본이다 — 이것을 실제 재료에 정확한 형태를 마킹하는 데 사용한다. 두 가지 주요 유형이 있다: 스틱 템플릿(얇은 배튼이나 봉으로 제작, 가볍고 조정 가능)과 솔리드 템플릿(합판·하드보드 등 얇은 판재, 더 강직하고 내구성이 있음).

📌 스틱 템플릿을 들어올리기 전: 최소 두 개의 대각선 보강재를 추가하라. 기준 모서리(어느 면이 면측인지), 기준점, 부품 번호, 방향 화살표를 바닥에서 벗어나기 전에 직접 템플릿에 마킹하라.
④ Construction Allowances · 건조 여유량
🇬🇧 What are allowances?
The lofted shape shows the finished theoretical outline of a component. Before cutting, the template must be adjusted to account for material that will be added or removed during fabrication. These adjustments are called construction allowances. Getting them right means the finished part fits correctly. Getting them wrong means the finished part is either too small (not enough material) or too large (must be reworked).
🇰🇷 여유량이란?
로프팅된 형태는 부품의 완성된 이론적 외곽선을 보여준다. 절단 전에 제작 중 추가되거나 제거될 재료를 고려하여 템플릿을 조정해야 한다. 이 조정을 건조 여유량이라고 한다. 올바르게 하면 완성 부품이 맞게 맞는다. 틀리면 너무 작거나 너무 커서 재작업이 필요하다.

⑤ Nesting, Labelling and Storage · 네스팅, 라벨링과 보관
🇬🇧 Nesting — minimising waste
When multiple shapes must be cut from a sheet of material, the arrangement of those shapes on the sheet is called nesting. The goal is to fit all required shapes with the minimum wasted material between them. Professional workshops use nesting software for complex jobs; the manual principle is the same — largest shapes first, smaller shapes fill the gaps.
🇰🇷 네스팅 — 낭비 최소화
여러 형태를 판재에서 절단해야 할 때, 그 형태들을 판재에 배치하는 것을 네스팅(nesting)이라고 한다. 목표는 형태들 사이의 낭비되는 재료를 최소화하면서 모든 필요한 형태를 맞추는 것이다. 가장 큰 형태를 먼저, 작은 형태가 빈 공간을 채운다.

Labelling pattern frames for storage · 패턴 프레임 보관용 라벨링

💡 나뭇결 방향: 목재 템플릿에는 결 방향도 마킹하라 — 완성 부품에서 나뭇결이 어느 방향으로 흘러야 하는지. 이것은 강도와 외관 모두에 영향을 미친다.
⑥ Revision Questions & Answers · 복습 문제 및 답변
Questions paraphrased in my own wording for copyright compliance. Answers are technically accurate. · 저작권 준수를 위해 질문을 내 표현으로 바꿔 작성. 답변은 기술적으로 정확합니다.
'Marine Composites' 카테고리의 다른 글
| Review: MEM12007D 보트빌딩 공학 수학 (0) | 2026.06.18 |
|---|---|
| Review: MEM12023 기계·공학 측정 수행 (0) | 2026.06.17 |
| Review: MEM11011B 인력 부하 작업시 유의 사항 (1) | 2026.06.04 |
| Review: MEM09021B 곡선형 3차원 형상의 이해와 제작 (0) | 2026.06.03 |
| Review: MEM09002B 설계도 해석 (1) | 2026.06.02 |


